Thursday, March 20, 2014

French Macarons, Take I


I have always been enticed by the beautiful colors and dainty appearance of French Macarons. When I was visiting my sister in Charlotte last summer, she took me to Amelie's French Cafe/Bakery where I got to taste one for the first time.  It was instant love.  Soon after I bought a book on Macarons and have been reading it and staring at it, and reading it and staring at it since then.  I was definitely intimidated because of all the things it said can go wrong for the amateur Macaron baker (that's me!).  They refer to Macarons as "troublesome" and that didn't do a lot for my confidence. The weather can't be too humid or too dry, all ovens bake differently, stacking baking sheets is recommended but you don't know if 2 are good or if you need 3.  Parchment or Silpat?  Aged egg whites. Don't fold too much, but make sure you fold enough.  Confidence & the courage to get started are a must.

Well it took me 7 months but I finally got up the courage to try. All seemed to go quite well.  The only area I was really concerned about was folding in the food coloring.  It instructed me to fold the egg whites and dry mixture 90%, then add the coloring and then finish with 1-2 more strokes.  No way can you fold anything thoroughly in 1-2 strokes.  I tried to use as few as possible, but it took me more like 6-8 strokes and at that I left the batter marbled.

Now it's time to pipe them out onto the parchment paper.  While I attempted to make each one uniform in shape and size, it was a bit difficult without any prior practice.  Not bad though.  I was not very successful in releasing the pressure without leaving a "tail".  I dropped the baking sheet on the counter several times and was able to lessen the tails, but unable to make them vanish altogether. (I later read that my mixture was not folded enough, surprisingly.)

All things considered, I am quite pleased with the results, and after reading the Troubleshooting section of the book, am prepared for a Take II.  I aspire to be an expert by Take III, well at least by Take IV. :)

As you can see by the photo, I made pink, green & lavender shells.  Since they are made with almond flour, they have a very delicate almond flavor.  I filled the pink ones with strained raspberry seedless jam, the green ones have crunchy chocolate ganache w/cacao nibs and the lavender with a blackberry butter cream.

I am not providing the recipe this go-around as I need to understand more of the science and the whys and wherefores of the structure of the macaron shell.  When I build more confidence and can make them without trembling hands and heart palpitations, I will then publish the recipe I used. Look for Take II followed by Take III, and hoping to end with the trilogy.


C'est bon!

Wednesday, March 19, 2014

Chocolate Chip, Brownie & Oreo Bars

These decadent bars have a chocolate chip cookie bottom, double-stuffed Oreos in the middle and brownie batter on top.  Hold onto your seat, because you are about to experience a serious sugar rush!  One of these satisfies your sweet tooth for the entire day!

Chocolate Chip Cookie Layer
1/2 c unsalted butter, softened
3/4 c granulated sugar
1/4 c light brown sugar
1 large egg
1/2 tsp vanilla extract
1-1/2 c all-purpose flour
1/4 tsp salt
1/4 tsp baking soda
1/2 c mini chocolate chips
16 Double Stuf Oreos, plus more for the top

Milk Chocolate Brownie Layer
6 T unsalted butter
8 oz milk chocolate, chopped
2/3 c light brown sugar
1 tsp vanilla extract
2 large eggs
2/3 c all-purpose flour
1 T unsweetened cocoa powder
1/4 tsp salt
1/4 tsp baking powder

Heat oven to 350*. Grease a 9x9-inch baking pan and line with a strip of parchment, allowing edges to hang over opposite sides.

For the chocolate chip cookie layer, beat together the butter, granulated sugar and brown sugar. Add egg and vanilla; beat until fluffy. Stir in flour, salt and baking soda, then add chocolate chips. Press dough into the bottom of the pan. Top with a single layer of Oreos.

To make brownie batter, melt together butter and chocolate and cool slightly. Stir in brown sugar, vanilla and eggs until smooth. Add flour, cocoa powder, salt and baking powder and stir until batter is smooth and glossy. Pour over Oreos in the pan.

Top brownie layer with extra crumbled Oreos. Bake until a toothpick inserted into the center comes out almost clean, 60-65 min. Allow to cool, then run a spatula around edges to loosen from pan. Use the parchment overhang to lift brownies out of the pan; slice and serve.  Makes 12 bars.

Recipe found in Ladies' Home Journal / March 2014


Sunday, March 16, 2014

Irish Pub Cupcakes


These cupcakes incorporate the 3 Irish libations that everyone thinks of on St. Patrick's Day > Guinness Stout, Jameson's Irish Whiskey & Bailey's Irish Cream Liqueur.  Together it's a party in your mouth.  The Guinness accentuates the chocolate and the sour cream makes the cake desirably moist.  Then the Jameson's in the chocolate ganache makes for a wonderfully tasty surprise, while the Irish Cream frosting brings with it a bit of Irish heaven.

Recipe adapted from AllRecipes.com.

Ingredients


Preheat oven to 350 degrees F. Line 24 muffin cups with paper liners.
Bring Irish stout beer and 1 cup butter to a boil in a saucepan and set aside until butter has melted, stirring occasionally. 
Mix in cocoa powder until smooth.
Whisk together flour, sugar, baking soda, and salt in a bowl until thoroughly combined.
Beat eggs with sour cream in a large bowl with an electric mixer on low until well combined. Slowly beat in the beer mixture, then the flour mixture; beat until the batter is smooth.
Divide batter between the prepared cupcake cups, filling each cup about 2/3 full.
Bake in the preheated oven until a toothpick inserted into the center of a cupcake comes out clean, about 17 minutes.
Cool the cupcakes completely. Cut cores out of the center of each cupcake with a sharp paring knife. Discard cores.
Bring cream to a simmer in a saucepan over low heat; stir in bittersweet chocolate until melted.
Mix in 2 tablespoons butter and Irish whiskey until butter is melted; let mixture cool to room temperature. Filling will thicken as it cools.
Spoon the filling into the cored cupcakes.

For frosting, whip 1/2 cup butter in a bowl with an electric mixer until fluffy, 2 to 3 minutes.
Set mixer to low speed and slowly beat in confectioners' sugar, 1 cup at a time, until frosting is smooth and spreadable. Beat in the Irish cream liqueur; adjust thickness of frosting with more confectioners' sugar if needed.
Spread frosting on filled cupcakes or apply using a piping bag.
Decorate as desired.  I sprinkled on a variety of St. Patrick's Day appropriate on decos and made shamrocks using green Candy Melts. Since I was making these for a friend for her Dad's 75th Birthday, I also made 75s from the Candy Melts and decorated half with those.


Slainte'!


Irish Soda Bread Muffins


Recipe adapted from Taste of Home recipe.

Ingredients

2-1/4 c flour
1/2 c sugar
2 tsp baking powder
1/2 tsp salt
1/4 tsp baking soda
1 egg
1 c buttermilk
1/4 c butter, melted
1/4 c canola oil
1/3 c currants
1/3 c dark raisins
1/3 c golden raisins

In a large bowl, combine the flour, 1/2 cup sugar, baking powder, salt, & baking soda. In another bowl, beat the egg, buttermilk, butter and oil. Stir into dry ingredients just until moistened. Fold in currants & raisins.

Fill greased muffin cups (or use liners) three-fourths full. Sprinkle with remaining sugar. Bake at 400° for 15 minutes or until a toothpick inserted near the center comes out clean. Cool for 5 minutes before removing from pan to wire rack. Serve warm.Yield: 1 dozen.


Cead mile failte!


Friday, March 14, 2014

Chocolate Hamantaschen

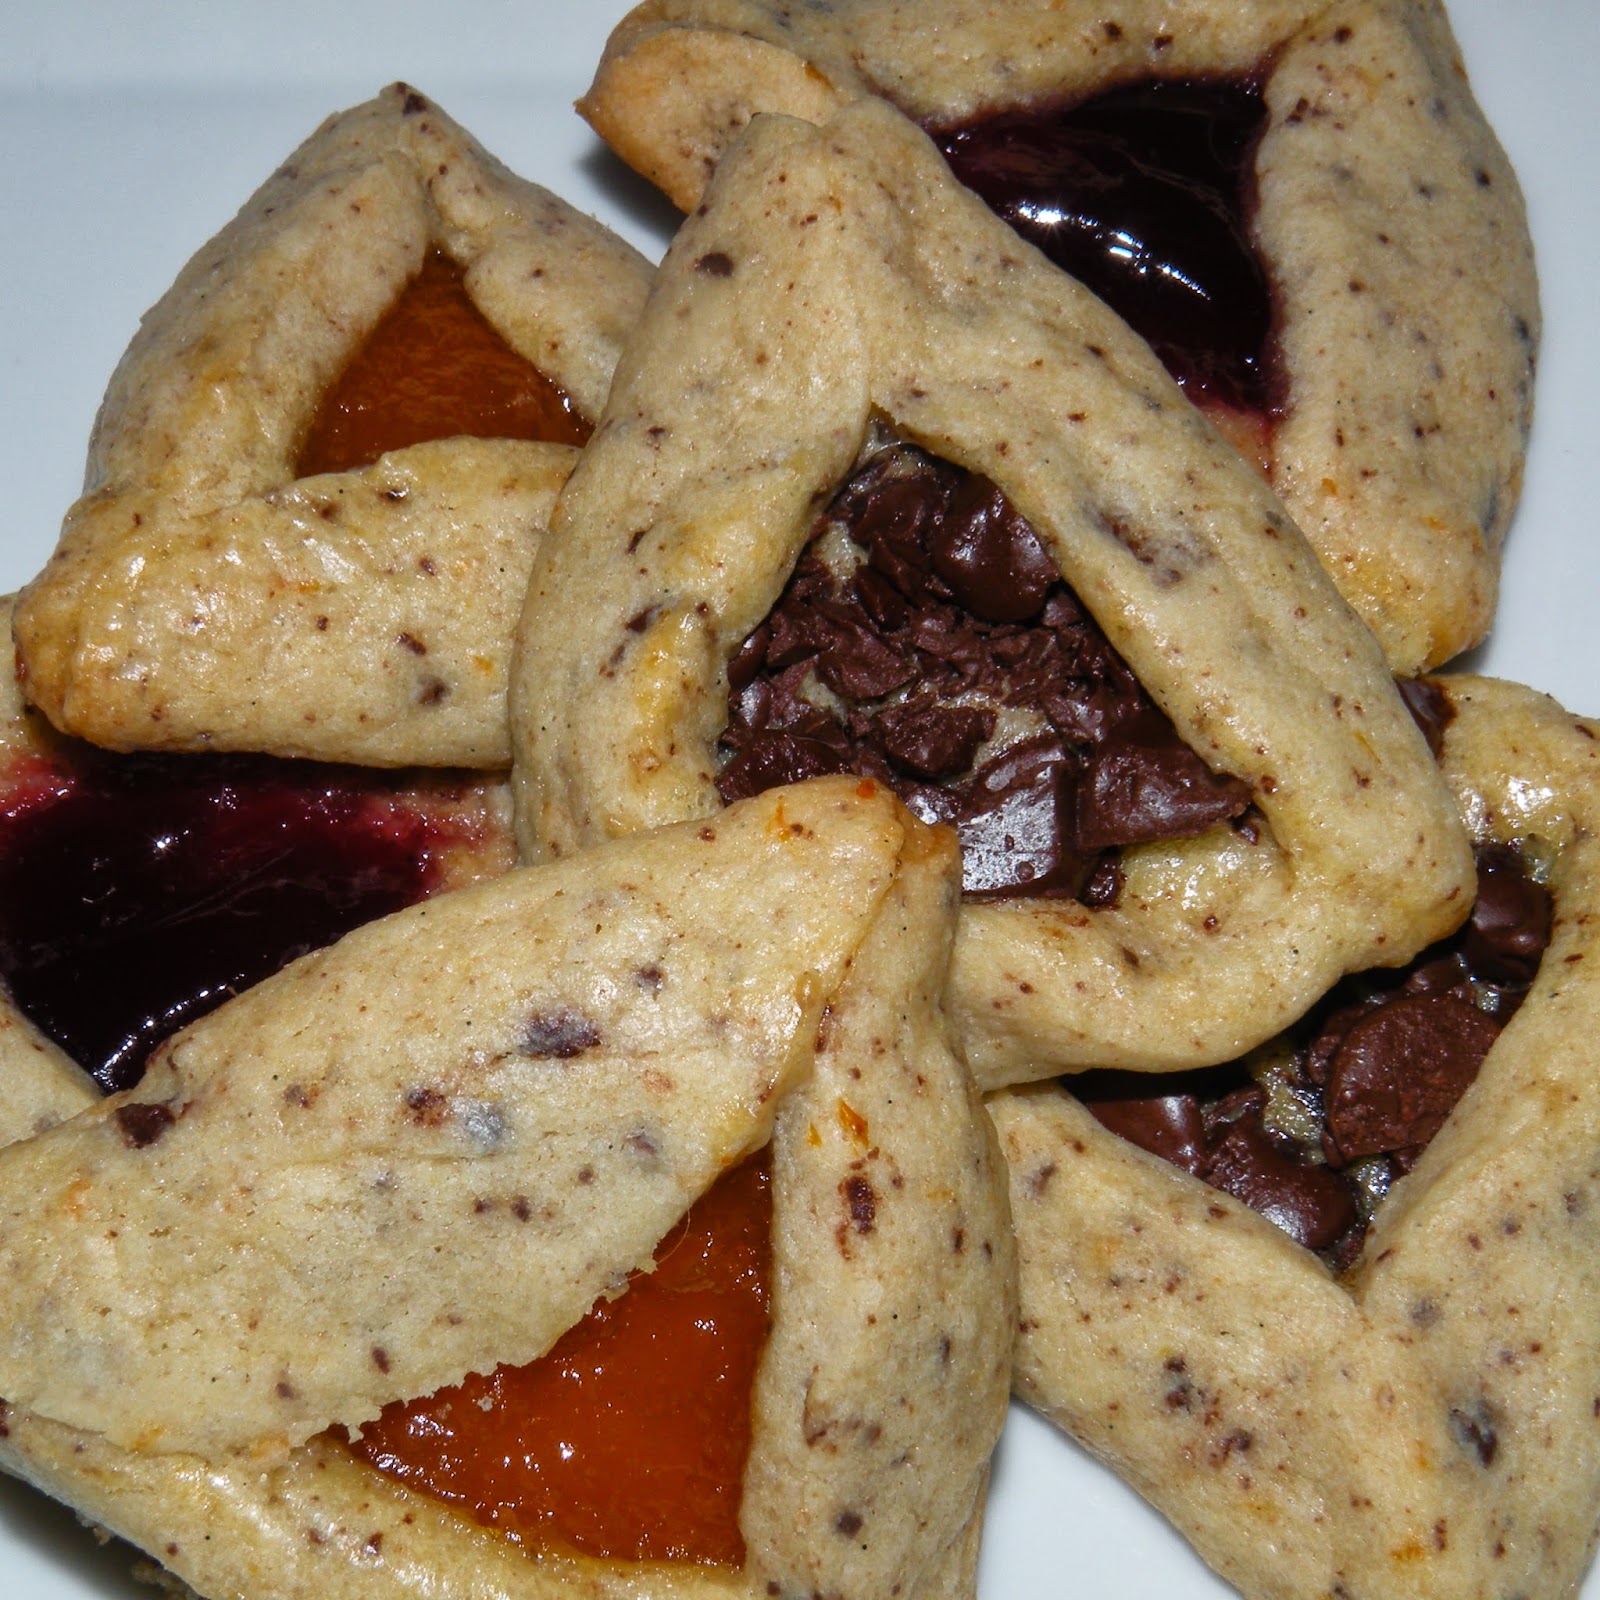
"Hamantaschen" is a Yiddish word meaning "Haman's pockets." Haman is the villain in the Purim story, which appears in the Biblical Book of Esther.

I decided to try my hand at making them as I've heard they can be unpredictable after they go into the oven.  That was a very true statement. Many opened up and just as many took on their own free-style shapes, even after adding an egg wash and pinching the corners.  About 1/3 looked the way they were suppose to.  Why they worked and 2/3 didn't will remain a mystery.  I took these cookies to an adult birthday party and everyone loved them.  I even received critical acclaim from Hamantaschen expert, so all in all, they were a success.  I plan on trying these again in an attempt to attain 100% cooperation inside the oven!

*Note* Rather than make them all chocolate centers, I added raspberry & apricot jam to some as well.  You can use whatever filling you'd like.

Ingredients
4 cups all-purpose flour, plus more for dusting
1 1/2 teaspoons baking powder
3/4 teaspoon coarse salt
2 sticks unsalted butter, room temperature
1 1/2 cups sugar
2 teaspoons finely grated orange zest (from 1 orange)
1 teaspoon pure vanilla extract
3 large eggs
10 ounces semisweet chocolate, 3 ounces very finely chopped, 4 ounces coarsely chopped
1/2 c seedless raspberry jam
1/2 c apricot jam

STEP 1
In a medium bowl, whisk together flour, baking powder, and salt. In another bowl, beat butter and sugar on medium speed until light and fluffy, about 3 minutes. Beat in orange zest and vanilla, then add 2 eggs, 1 at a time, scraping down bowl as necessary.
STEP 2
Reduce speed to low and gradually beat in flour mixture until combined. Add finely chopped chocolate and beat until just combined. Form dough into three 1-inch-thick disks, wrap tightly in plastic, and chill until firm, at least 1 hour and up to 3 days.
STEP 3
On a floured work surface, roll out dough to about a 1/8-inch thickness. With a 3-inch round cutter, cut out circles; place on parchment-lined baking sheets. Gather scraps, chill, and repeat.
STEP 4
Whisk together remaining egg and 1 teaspoon water in a bowl. Brush circle edges with egg wash. Place 1 rounded teaspoon coarsely chopped chocolate in 1/3, raspberry jam in 1/3 and apricot jam in the last 1/3 in center of each circle. Lift sides of dough toward center, over filling, to form a triangle; pinch seams together. Freeze until firm, about 30 minutes. Preheat oven to 350 degrees with rack in center.
STEP 5
Bake cookies, 1 sheet at a time, until golden, 12 to 15 minutes. Let cool 5 minutes, then transfer to wire racks to cool completely.


Sunday, March 9, 2014

Chocolate Banana Nana Bars

Moist, cake-like bars that incorporate chocolate, bananas & peanut butter chips.  Good as dessert or snacks.  Wrap tightly or store in an air tight container to maintain moistness.

Ingredients

1 c sugar
1 stick butter, softened
3 medium bananas, mashed
1 large egg
1 tsp vanilla
1 1/2 c all-purpose flour
1 tsp. baking powder
1 tsp. baking soda
1/2 tsp. salt
1/4 c unsweetened cocoa
1/3 c chocolate chips
1/3 c peanut butter chips
Confectioners' sugar for dusting

Makes about 36 bars.

Preheat oven to 350*. Grease a 9x13 pan. Combine the sugar and butter in a large bowl and beat with an electric mixer on medium speed, scraping the bowl several times, until light and fluffy, 1-2 minutes. Add the bananas, egg and vanilla and continue beating and scraping the bowl until well mixed, 1-2 minutes longer. Combine the flour, baking powder, baking soda, and salt in a medium bowl and stir with a whisk to blend. Add to the banana mixture and beat on low speed for 1-2 minutes, scraping the bowl several times, until the batter is well mixed.

Measure out 1 1/2 cups of the batter and place in a separate bowl.  Add the peanut butter chips.  Drop by spoonfuls into the prepared pan, leaving gaps for the chocolate batter. Add the cocoa to the remaining batter and beat on low speed for about 30 seconds.  Mix in the chocolate chips.  Drop by spoonfuls into the pan, covering the bottom.  Using an offset spatula lightly and carefully smooth the batter so it is even across the pan without mixing the two batters too much for a black & white effect.

Bake for 20 to 25 minutes, or until a toothpick inserted in the center comes out clean. Transfer to a wire rack to cool.  Just before serving, dust with confectioners' sugar.  Cut into bars.


Saturday, March 8, 2014

Lemon and Ricotta Cream Cheese Cake


This is a refreshing change from the classic New York style cheesecake as it incorporates ricotta cheese as well as cream cheese in a shortbread crust. I rate this a 5/5.

Ingredients

1 c flour
1/4 c granulated sugar
6 T unsalted butter, chopped

12 oz. cream cheese, softened
16 oz. ricotta cheese
4 eggs
1/2 c freshly squeezed lemon juice
2 T lemon zest
1 c granulated sugar
1/2 tsp vanilla

1 1/2 T cornstarch
1 1/2 T cold water

1 c sour cream
1/4 c granulated sugar

Preheat oven to 300*.
In a large bowl add flour, sugar & butter.  Rub together between fingers until course crumbs form. Press in the bottom of a 9" springform pan.  Bake approx. 30 minutes until golden.  Set aside to cool.

In a food processor place cream cheese, ricotta cheese, eggs, lemon juice, lemon zest, sugar and vanilla and process until smooth.  In a small bowl mix cornstarch with water.  Add to mixture and process until blended.  Pour into cooled crust and bake 1 hr. 30 minutes until golden brown and slightly wobbly in the very center.  Turn oven off.

Mix sour cream and sugar together.  When cheesecake is done, spread sour cream over the top and return to the oven, heat off and door closed, for an hour.

Refrigerate for 4 hours or overnight.

This recipe is adapted & converted from Donna Hay's Classic Lemon Cheesecake.


Lemon Curd Tart with Cornmeal Crust

If you like a rich, buttery lemon dessert, you are going to love this one.  This recipe was adapted from Martha Stewart's Marbled Lemon Tart w Sage-Cornmeal Crust.  I omitted the sage as I was making it for my Father who would not have appreciated that ingredient.  I feel compelled to share with you my experience with making this.  The instructions are easy and straight-forward; however, the problem was with the cooking time on the stove.  The instructions say to place heatproof bowl over simmering water and whisk constantly until thickened and instant read thermometer reads 160*.  The first time I made this, I removed it from the heat when it reached 160* even though it was not thickened.  It never got real thick and when you cut into it (after being in the frig overnight), it ran like eggs yolks.  Tasted wonderful, but wasn't pretty and the swirls sank as they were heavier than the lemon mixture.  This time, I cooked it until it became thick.  The temperature on the thermometer was more like 168*.  It could be my thermometer is not accurate. So my recommendation to you is to cook until it becomes thickened no matter what the instant read says.  Additionally, when in the ice water bath I continually stirred it beyond the 2 minutes as I didn't feel it had thickened much, if at all.  I probably kept it in the bath more like 5-6 minutes.  I was determined that this curd would be thick this time and it worked beautifully!

INGREDIENTS
1/4 teaspoon unflavored gelatin
1 tablespoon cold water
6 large egg yolks
1 cup sugar
1/4 teaspoon salt
1/2 cup fresh lemon juice
1/2 cup (1 stick) unsalted butter, cut into tablespoons
3 tablespoons creme fraiche (I used sour cream thinned with sugar)

DIRECTIONS

STEP 1
Sprinkle gelatin over cold water in a small bowl, and let stand until softened, about 5 minutes.
STEP 2
Whisk together egg yolks, sugar, and salt in a large heatproof bowl. Gradually whisk in lemon juice. Place bowl over a saucepan of simmering water, and whisk constantly until mixture has thickened and registers 160 degrees on an instant-read thermometer. Whisk in gelatin mixture. Remove from heat, and whisk in butter, a few pieces at a time, until smooth. Let cool, stirring occasionally. Prepare an ice-water bath. Place bowl of yolk mixture over bath, and stir until slightly thickened, about 2 minutes.
STEP 3
Spread curd into crust; smooth top. Dollop creme fraiche on top. Using a wooden skewer or the tip of a knife, swirl creme fraiche into curd to create a marbleized effect. Refrigerate until firm, at least 2 hours (or up to overnight).


 Looking at these photos makes me want to eat it all over again!


Thursday, March 6, 2014

Mardi Gras King Cake


I made this recipe for the first time and I was very pleased with the results.  There are many King Cake recipes on the internet, but this one enticed me the most with the almond filling.  I love anything almond, and this did not disappoint.  I found some trinkets at the dollar store and inserted one in each cake.  I rate this 5/5.


Ingredients

  1. In a large bowl, dissolve yeast in warm water. Add the milk, shortening, sugar, salt, egg and 2 cups flour. Beat on medium speed for 3 minutes. Beat until smooth. Stir in enough remaining flour to form a soft dough (dough will be sticky).
  2. Turn onto a floured surface; knead until smooth and elastic, about 6-8 minutes. Place in a greased bowl, turning once to grease top. Cover and let rise in a warm place until doubled, about 1 hour.
  3. Punch dough down. Turn onto a lightly floured surface; divide in half. Roll one portion into a 16-in. x 10-in. rectangle. Spread almond filling to within 1/2 in. of edges. Roll up jelly-roll style, starting with a long side; pinch seam to seal. Place seam side down on a greased baking sheet; pinch ends together to form a ring. Repeat with remaining dough and filling. Cover and let rise until doubled, about 1 hour.
  4. Bake at 375° for 20-25 minutes or until golden brown. Cool on a wire rack. For glaze, combine the confectioners' sugar, vanilla and enough water to achieve desired consistency. Spread over cooled cakes. Sprinkle with colored sugars.Yield: 2 cakes (12 servings each).
Original recipe found at Taste of Home


Tres bien!

.