Showing posts with label christmas. Show all posts

Wednesday, December 2, 2015

Cranberry Cake Squares

Ingredients

3 eggs
2 cups sugar
3/4 cup butter, softened
1 teaspoon vanilla
2 cups flour
12 oz fresh cranberries

Preheat oven to 350 degrees. With a mixer, beat the eggs with the sugar until slightly thickened and light in color, about 5-7 minutes. The mixture should almost double in size. The eggs work as your leavening agent in this recipe, so do not skip this step. This mixture should form a ribbon when you lift the beaters out of the bowl. Add the butter and vanilla; mix two more minutes. Stir in the flour until just combined. Add the cranberries and stir to mix throughout.

Spread in a buttered 9x13 pan. Bake for 40-50 minutes, or until very lightly browned and a toothpick inserted near the center of the cake comes out clean. (I baked mine for 43 minutes.) Let cool completely before cutting into small squares.


Enjoy!


Wednesday, December 17, 2014

Winter Wonderland Cake


Ingredients
Nonstick cooking spray for baking
7 tablespoons unsalted butter, softened
1 ½  cups granulated sugar
1 ¾ cups cake flour
2 teaspoons baking powder
1 teaspoon salt
¾ cup milk
3 tablespoons canola oil
1 teaspoon almond extract
2 tablespoons red edible glitter

For the Buttercream:
Pinch salt
1 pound unsalted butter, cut up and slightly softened

To assemble:
6 Meringue Trees (optional)

Directions
For the Cake:
Preheat oven to 325 degrees F. Line a 15x10x1-inch baking pan with parchment paper. Coat with non-stick baking spray; set aside.
In a large mixing bowl beat the butter and granulated sugar with an electric mixer on low speed until just combined. Increase speed to high and continue beating until light and fluffy.
In a medium bowl combine the flour, baking powder, and salt. Whisk for 30 seconds to distribute the leavening. Set aside.
Into another bowl whisk together the egg whites, milk oil, and almond extract. Set aside.
Alternately add the flour mixture and egg mixture to the butter mixture, adding about half of each with each addition. Beat on low speed until smooth after each addition. Fold in the red edible glitter until combined.
Pour the batter into the prepared pan and smooth with an offset spatula. Bake for 20 to 25 minutes or until the cake just begins to pull away from the sides and springs back in center when lightly touched. Remove and cool completely in pan on a wire rack.
Cut the cake in half lengthwise and then in half again crosswise to create four 5x7 1/2-inch rectangles.
For the Buttercream:
In a large heatproof bowl whisk the egg whites, sugar, and salt over a pan of simmering water until the sugar melts completely and the mixture reaches 160 degrees F, about 8 minutes. Whisk constantly to make sure the eggs don't begin to cook.
Remove bowl from above simmering water. Beat with a mixer on high speed until stiff peaks form. Add the butter, a small piece at a time, until the mixture thickens and becomes smooth and spreadable. If the mixture looks as if it's curdling, add another small piece of butter and continue whisking until the mixture smooths.
To assemble:
Place one layer of cake on a cake stand. Spread an even layer of buttercream over the cake, about 3/4 cup, and continue adding layers and spreading the buttercream until all the layers are stacked (There will be extra frosting). Place the cake in the freezer for 20 to 30 minutes to allow the buttercream to set. Once the buttercream feels firm, spread the remaining buttercream over the cake in a smooth layer. Refrigerate until set, about 30 minutes. Decorate with Meringue Trees, if desired. Sprinkle with powdered sugar.

Meringue Trees

Ingredients

Pinch salt
1 drop red gel food coloring
½ cup superfine granulated sugar

Preheat oven to 250 degrees F. Line 2 baking sheets with parchment paper. Set aside. Fit a large pastry bag with a large star tip. Set aside.
In a large mixing bowl beat the egg whites, salt, and food coloring with an electric mixer on high speed until the mixture looks foamy. Add the sugar slowly, a tablespoon at a time. Continue beating until the meringue reaches stiff peaks and is white and shiny.
Transfer the meringue to the pastry bag fitted with a 1/4-inch star tip and pipe smaller "pine" trees on one baking sheet that are 2 to 3 inches tall by first gently piping a small, quarter sized star onto the parchment and then rotating the tip slightly and piping another, smaller star shape atop the first. Continue until you've reached your desired height, lifting the tip so that the meringue ends in a peak. Space trees 1-inch apart. On the second baking sheet, pipe 3- to 4-inch trees. Bake the larger meringues for 65 to 75 minutes or until the meringues are baked through but have not browned, adding the sheet with the smaller trees after 10 minutes of baking.Turn oven off and let meringues dry in the oven with the door closed for 1 hour.

(Recipe taken from BHG)


Monday, November 24, 2014

Holiday Ribbon Wreath


This wreath is a bit time-consuming but very easy and sort of mindless. However, it yields beautiful results.  I prefer wired ribbon as I can pinch and poke and tweak it to my liking.  This wreath can be made at any season or any time during the year, using appropriately colored ribbon.

Supplies:

1 12" wire wreath
50-60 yds. ribbon depending on how tightly packed you want it, cut into 6" lengths. I used 2 (3 yd) rolls each of 5 differently patterned wire ribbon.  You can use any combo you like.
Scissors

It's best if you cut all your ribbon first and stack it in front of you.  All you do then is tie the ribbon onto the wreath and fill it up. Whether you want to plan a pattern or attach randomly is your preference.


Have fun!

Tuesday, December 17, 2013

White Chocolate Holiday Bark


Everything but the kitchen sink is included in this holiday bark. Feel free to substitute, add or delete any ingredients.

This is what I used:

Toasted Cashews, Pepitas & Whole Almonds
Chopped dried pineapple and apricots
Dried cranberries and cherries
Mini M&Ms
24 oz. white chocolate, divided
Chopped red & white Andes Candies
Fleur de Sil (optional)

Combine nuts, fruits, mini M&Ms in a bowl. Set aside.
Melt 18 oz. chocolate in a bowl over a pot of boiling water.
Spread onto a parchment-lined baking sheet; use two if necessary.  Use an offset spatula to smooth out the chocolate to a little less than 1/4".
Sprinkle the the fruit and nut mixture over the top leaving some white chocolate showing.  Press in slightly.
Sprinkle very lightly with Fleur de Sil. I used less than 1/4 tsp.
Melt remaining white chocolate and drizzle back and forth over the fruit and nuts.  Sprinkle with Andes Candies.
Let sit for 2-3 hours until completely set.
Break into pieces and store in an airtight container.


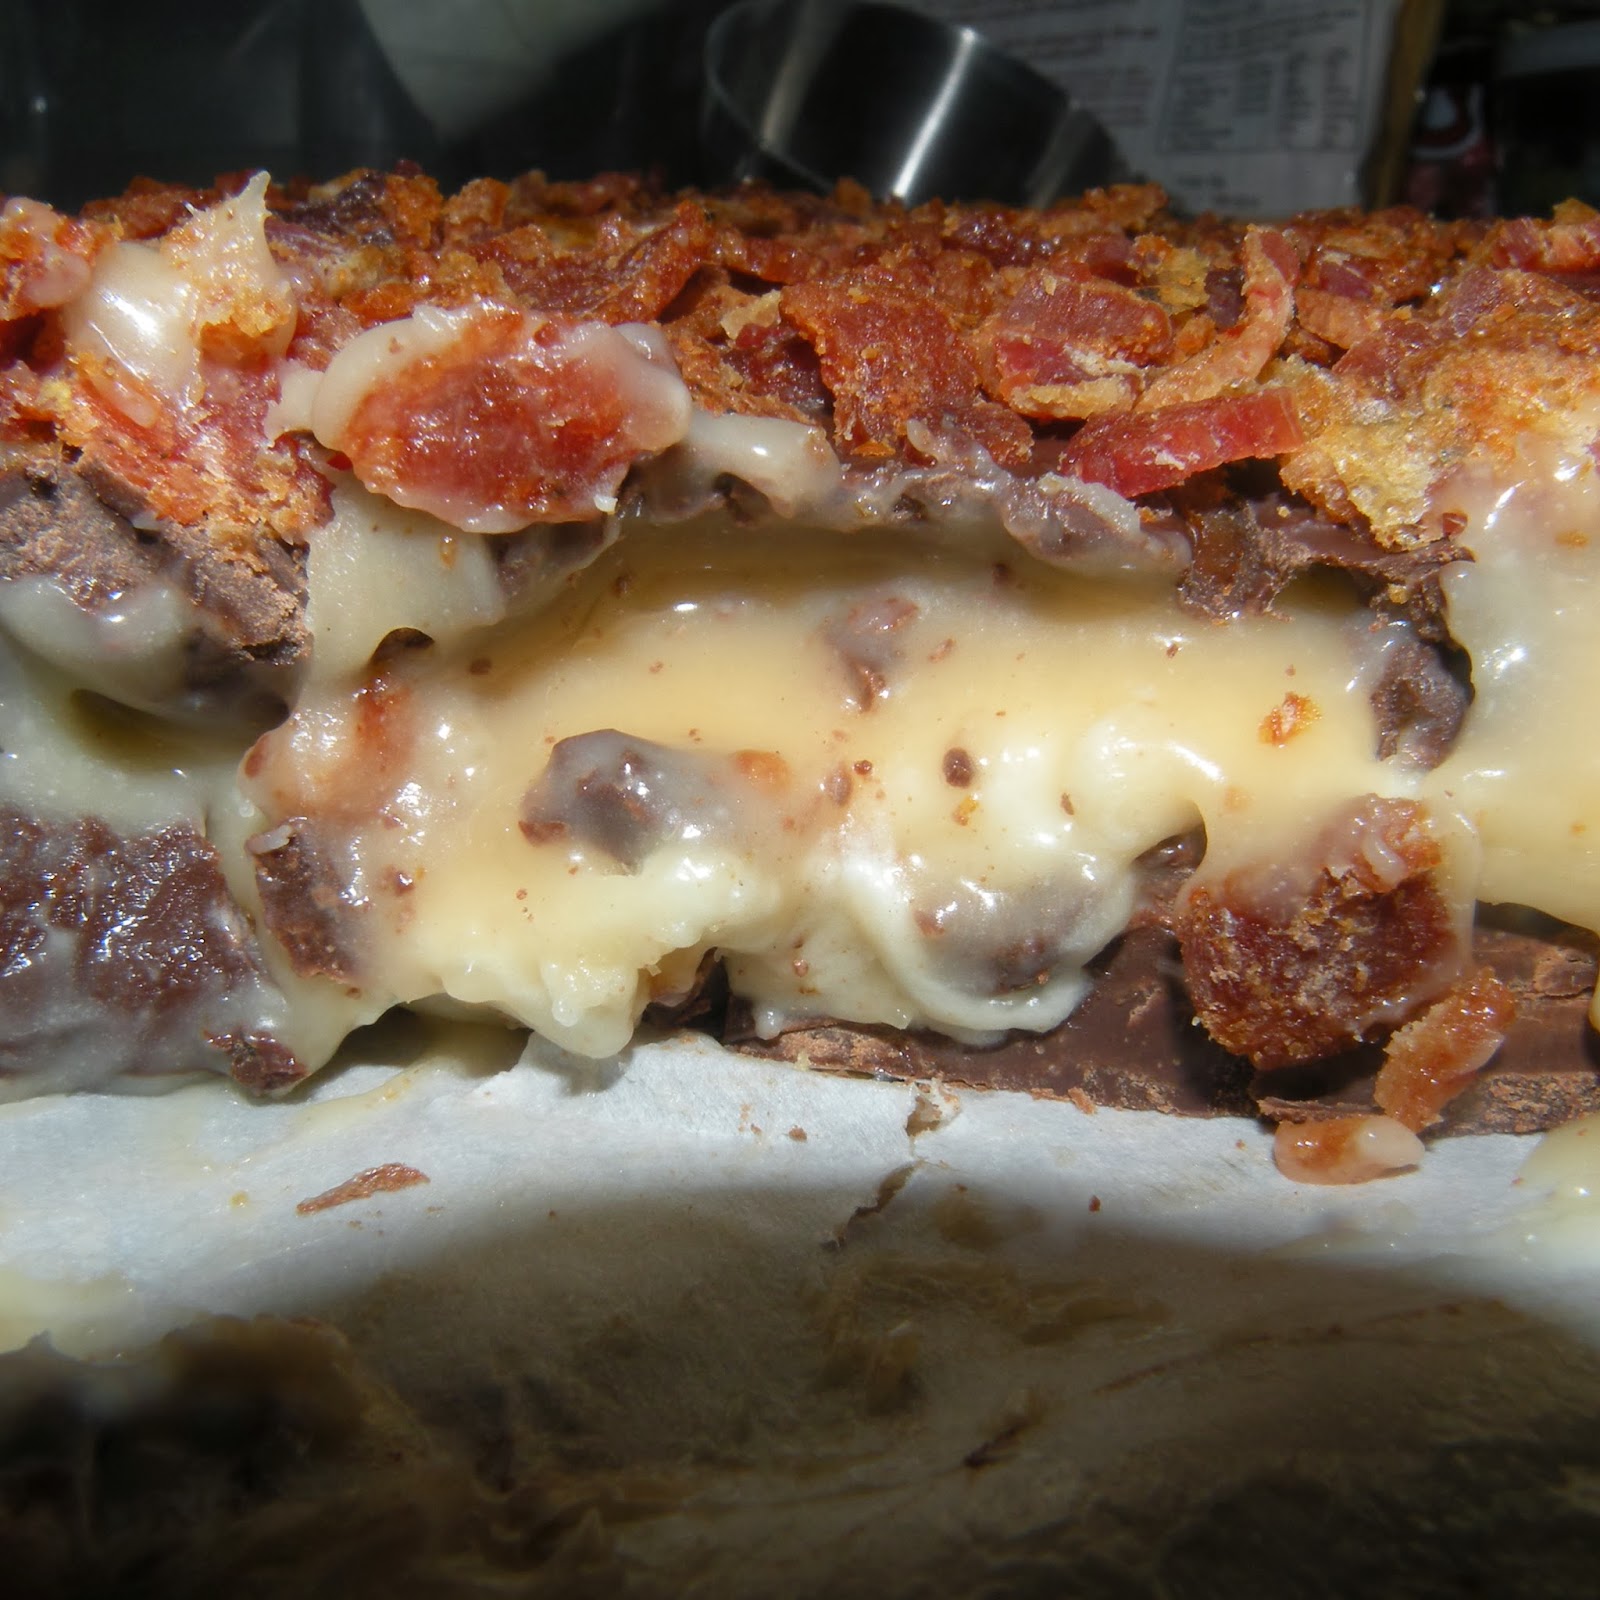
Chocolate, Whiskey, Marshmallow, Caramel & Bacon Bark

When I saw this recipe, it was so unusual, I knew I had to try it.  It is as good as it looks.  The sweet, the salty, the touch of whiskey and the chocolate all come together fabulously.

The only negative I feel compelled to point out is that it's very time-consuming and only makes an 8x8 product.  Next time I would use a large dish and make it thinner so it goes further.

Here's the recipe: http://www.endlesssimmer.com/2011/12/08/edible-holiday-gifts-whiskey-caramel-mashamallow-and-bacon-bark/


Monday, December 16, 2013

Creme of Coconut Poke Cake

Super moist and flavorful, this luscious cake is a must when you are craving the richness and sweetness of coconut.  It's simple to put together.  Waiting for it to chill thoroughly is the hardest part of this recipe.

Ingredients:

1 box white cake mix, prepared according to instructions on box
1 can sweetened condensed milk
1 can Creme of Coconut NOT coconut milk
1 12 oz. container of non-dairy topping
1 8 oz. pkg, sweetened coconut

Prepare cake mix and bake in a greased and floured 9x12 dish.
While cake is baking combine the sweetened condensed milk and the Creme of Coconut in a bowl and whisk until smooth.
Immediately after cake is removed from the oven, poke holes all over the top (I used a chop stick) and pour the milk mixture over the top.
Allow to cool completely before placing it in the fridge to chill.  Once the cake is thoroughly chilled, spread non-dairy topping over the top and sprinkle coconut evenly over it.  Return to the fridge and

Enjoy!


Kahlua Cocoa Balls


I looked at a few recipes and didn't like any one 100%, so I took the things I did like and added my own touch and this is what I came up with.  These are better made at least 2-3 days ahead; 1 week is best.  Gives all the flavors time to marry.

Ingredients:

2 c graham crumbs
1 c confectioners' sugar
1/3 c unsweetened cocoa
10 oz. finely chopped bittersweet chocolate
1/3 c Kahlua mixed with 1 T espresso powder
1/4 c dark corn syrup

Heat the Kahlua and the espresso powder in a microwave safe bowl for 15 seconds.  Stir until espresso powder is dissolved. Mix all ingredients in a large bowl with your hands until they are totally blended and come together. The dough should be just moist enough to hold its shape; not crumbly. If mixture is too crumbly, add another tablespoon of corn syrup.  In another bowl sift some unsweetened cocoa.  Roll each ball into the cocoa and store in an airtight container for 2-3 days before serving.


Saturday, November 16, 2013

Candied Orange Peel

My favorite thing in a chocolate shoppe is chocolate covered orange peel; however, orange peel without the chocolate is amazing itself!  I'm going to need some of this for some upcoming recipes, so it's drying on the rack for now.

Here's how it's done:

5-6 large navel oranges
4 1/2 c granulated sugar
1 1/2 c water

Score each orange thru the pith about 6 times around.  Remove from the orange and with a sharp paring knife remove the excess pith.  It's okay to leave some on but you don't want it to be too thick.  This is the bitter part.  After you have done this with all your oranges, cut the peel into 1/4" slices and place into a large sauce pan.  Add enough cold water to cover and bring to a boil.  Once it has come to a full boil, pour off the water and start again with fresh cold water.  You want to repeat this process 3-4 times in order to soften up the peel and lessen their bitterness.


Add 1 1/2 c water and 4 1/2 c sugar to a heavy sauce pan.  Bring to a simmer and continue cooking until the temperature on a candy thermometer reads 300* - 340* (thin thread stage).  At this time, add the orange peel and adjust the heat to keep the peel simmering for about 45 minutes or until translucent.  Do not stir during this time.

Have a bowl with about 1 1/2 c sugar ready.  Once the peel has finished simmering, drain off the syrup (you can reserve this and use for other recipes or beverages if you desire).  Dump the peel into the bowl of sugar and toss to coat.  Remove to a wire rack and dry for several hours or overnight.


Orange you glad I shared this with you?

Santa's Winter Wonderland


This was inspired from the BH&G Holiday Craft Ideas 2013 magazine.  They offered so many wonderful craft projects this year, I find myself making one after another.  I put my own twist on this one, but it's based on the one in the magazine.  The directions are lengthy, so I will only offer the basics.  It's fairly easy to make. If you do crafts on a regular basis, I would rate this as Intermediate level.  The most difficult is making Santa.  He is created from styrofoam covered with Creative Air Dry Clay.

Supply List:

6" styrofoam cone for Santa's body
2"  styrofoam ball for Santa's head
Creative Paperclay or other brand of air dry clay (Note: Creative is non-toxic)
Wool roving for Santa's hair, mustache & beard
Silver chenille stem
2-3 bottle brush trees in different sizes
Small reindeer
Sparkle Mod Podge
Sno-Tex or Glistening Snow-Tex
Acrylic Paints in Sea Foam Green, Dark Blue, Black, Red, Fleshtone, & White)
Small ornaments
Piece of silver garland
Ephemera for tree toppers
Hot glue gun & glue sticks
Cake stand or other suitable base to glue your wonderland to

You want to start with Santa.  Cover the cone and the ball with a thin layer of clay.  Roll out 2 small pieces and shape into arms with mittens and attach to the body.  Pinch off 3 tiny pieces to be attached to the head as cheeks and nose.  Sculpt them best you can.  Form a cone for the hat.  With a needle make a hole in the tip of the hat about 1/2" deep. Let all dry for at least 24 hours or until entirely dry.

Paint the body with Sea Foam Green, paint the mittens dark blue.  Dapple white down the front and above the mittens for fur.  Dip end of brush in white and apply dots to the cap.  Paint the entire head in a fleshtone. Loosen some red paint and lightly apply to the cheeks.  Dip end of brush in black and make 2 dots for the eyes.  When dry, dip a stylus in white and apply a smaller dot to the right side of each eye. You can add eyebrows and highlight each cheek and down the nose with white paint.

Attached head to body with half a toothpick or a piece of wooden skewer and some hot glue.  Tear off some wool roving and make beard & mustache and hair.  Glue all in place.  Now add the hat.  Cut a piece of the chenille stem and curl one end.  Glue the other end into the hole in the tip of the hat.

Paint the entire Santa and the reindeer with Sparkle Mod Podge to give the pieces some sparkle.

With SnowTex, add a little snow to the top and the ends of the branches on the trees.  Add ephemera to the top of each tree as a topper.

Glue Santa, trees and reindeer to the stand. Tuck in some garland and glue in spots to keep in place.  Glue ornaments on top of garland wherever it suits you.

I applied SnowTex around the trees to give the effect of drifting snow.  I thought this was a nice touch.  I also added a little glass owl to the tallest tree.  You can decorate your wonderland any way you please.


A beautiful site; we're happy tonight ...