Showing posts with label crafts. Show all posts

Wednesday, October 22, 2014

A Bat in my Belfy Craft Project


This is a very easy and fairly quick Halloween project once you have gathered the supplies.

Supplies needed:

2" styrofoam ball
4" styrofoam egg
2 toothpicks
White craft glue
1 black stretchy sock
22 ga. black wire or thin wire easily bendable with fingers
1 black chenille stem
Black felt, stiff type (I used a sparkly one)
Scissor
Craft knife
3 beads for eyes and nose
Halloween ribbon, approximately 6" long
5x7 picture frame w/o glass
5x7 decorative paper
Hot glue gun & glue sticks
Acrylic paints, optional

Press the styrofoam ball on a hard surface flattening one side.  Press the short end of the styrofoam egg the same way to make the end flat.  Insert the toothpicks down in the flat end of the egg.  Add some white glue over the flat area. Press the flat end of the ball onto the toothpicks and gently push down until it is flush with the egg.  Let dry.

Take the stretchy sock and carefully pull it down over the styrofoam shape starting at the ball, making sure the toe seam is across the ball. Keep working the sock down across the body until it is smooth.  Tie off the sock beneath the egg with the wire.  Snip off the excess sock leaving about 1/2" (kinda like a balloon).  Take the chenille stem and wrap around the wire twice.  Trim the stem to about 2" on each side, then bend up 1/2" at the end for feet.

Make the wings and the ears.  Look at the photo below and make a wing template that is approx. 4-1/2" long and 4-1/2" tall at the widest part (on the right side).  The ear template is 3/4" wide and 1-1/2" tall.  Fold the felt in half and place the template on the folder where specified and cut one.  Cut 2 ear templates.


Fold the flat part of the ears together and place a dot of hot glue in between and pinch until glue has dried.  Decide where you will place the ears.  With a craft knife or other sharp knife make a slit for each ear and add a drop of hot glue.  With the end of one scissor blade, push the ear down into the head and let dry.  Now attach the wings to the back with the hot glue gun.

Attach the beads for the eyes and the nose with not glue.  If your beads have holes you can hide them with some glitter glue.  I used purple.  I also added a heart with the same glitter glue.

If you like the frame the way it is, no preparation is needed.  I thinned some black & purple acrylic paint and splattered it all over as my frame was too plain.

Cut a piece of decorative paper to fit in the frame as a background.  Now take your ribbon and glue one end to the back of the bat.  Place the bat against the frame where you want it; holding it in place, glue the other end of the ribbon over the top and onto the back of the frame.  That's it!  Now stand back and admire your work.  Place it in your belfry or on a tabletop or wall and you now have a new Halloween decoration that you made yourself.


(Adapted from Holiday Crafts 2014 magazine.)

Enjoy!


Monday, September 29, 2014

Sugar Pumpkin Mum Pots


Great Fall decoration for door prizes, to enhance a dinner table or make individual pumpkins for each guest with their name written on the leaf as place cards.


Supplies:

1 Sugar Pumpkin
Pumpkin Carving knife or other small sharp knife
Pumpkin flesh removal scoop or big spoon
Drill with 1/4" drill bit
Assorted Mum stems
Silk leaves (optional)
Sharpie w fine pt. (optional)

With a sharp knife cut a circle 1" below the stem of the pumpkin, make cuts at an inward angle so the top does not fall into the pumpkin when replaced.
Using a scoop or large spoon, remove all of the flesh inside (reserve pumpkin seeds for roasting later. See my recipe for Spicy Roasted Pumpkin Seeds).
Drill 5 evenly spaced holes around and through the pumpkin about 1" down from opening.

Fill with water and replace top.
Trim leaves from stems of Mums and cut to fit through the holes and well into the water.
If you want to add a message or use as place settings at a dinner party, write on the silk leaves with a fine point Sharpie.  Attack to pumpkin with a straight pin.  Hot glue will come loose unless you are using artificial pumpkins.


Saturday, November 16, 2013

Santa's Winter Wonderland


This was inspired from the BH&G Holiday Craft Ideas 2013 magazine.  They offered so many wonderful craft projects this year, I find myself making one after another.  I put my own twist on this one, but it's based on the one in the magazine.  The directions are lengthy, so I will only offer the basics.  It's fairly easy to make. If you do crafts on a regular basis, I would rate this as Intermediate level.  The most difficult is making Santa.  He is created from styrofoam covered with Creative Air Dry Clay.

Supply List:

6" styrofoam cone for Santa's body
2"  styrofoam ball for Santa's head
Creative Paperclay or other brand of air dry clay (Note: Creative is non-toxic)
Wool roving for Santa's hair, mustache & beard
Silver chenille stem
2-3 bottle brush trees in different sizes
Small reindeer
Sparkle Mod Podge
Sno-Tex or Glistening Snow-Tex
Acrylic Paints in Sea Foam Green, Dark Blue, Black, Red, Fleshtone, & White)
Small ornaments
Piece of silver garland
Ephemera for tree toppers
Hot glue gun & glue sticks
Cake stand or other suitable base to glue your wonderland to

You want to start with Santa.  Cover the cone and the ball with a thin layer of clay.  Roll out 2 small pieces and shape into arms with mittens and attach to the body.  Pinch off 3 tiny pieces to be attached to the head as cheeks and nose.  Sculpt them best you can.  Form a cone for the hat.  With a needle make a hole in the tip of the hat about 1/2" deep. Let all dry for at least 24 hours or until entirely dry.

Paint the body with Sea Foam Green, paint the mittens dark blue.  Dapple white down the front and above the mittens for fur.  Dip end of brush in white and apply dots to the cap.  Paint the entire head in a fleshtone. Loosen some red paint and lightly apply to the cheeks.  Dip end of brush in black and make 2 dots for the eyes.  When dry, dip a stylus in white and apply a smaller dot to the right side of each eye. You can add eyebrows and highlight each cheek and down the nose with white paint.

Attached head to body with half a toothpick or a piece of wooden skewer and some hot glue.  Tear off some wool roving and make beard & mustache and hair.  Glue all in place.  Now add the hat.  Cut a piece of the chenille stem and curl one end.  Glue the other end into the hole in the tip of the hat.

Paint the entire Santa and the reindeer with Sparkle Mod Podge to give the pieces some sparkle.

With SnowTex, add a little snow to the top and the ends of the branches on the trees.  Add ephemera to the top of each tree as a topper.

Glue Santa, trees and reindeer to the stand. Tuck in some garland and glue in spots to keep in place.  Glue ornaments on top of garland wherever it suits you.

I applied SnowTex around the trees to give the effect of drifting snow.  I thought this was a nice touch.  I also added a little glass owl to the tallest tree.  You can decorate your wonderland any way you please.


A beautiful site; we're happy tonight ...

Thursday, November 14, 2013

Snowman Repurposed from Old Book


Materials:

Old hardcover book
Crafts knife
Cutting mat
Hot glue gun and glue sticks
White crafts glue
Glitter
4" square of black felt
Narrow strip of felt for scarf

Refer to BH&G Holiday Crafts 2013 Magazine for templates and more detailed instructions.

Alternative instructions:

Sketch a snowman that fits nicely between the top and the bottom of the old book you have chosen.  Note:  The more pages in the book, the fuller your snowman will be.
Cut out the snowman and fold in half.
With your crafts knife remove the cover from the book and any blank pages at the front and back.
Grab approx. 8-10 pages, slip your cutting mat underneath and place your folded template with the folded edge at the binding.  Following the line of the template, carefully cut through the pages with the craft knife.  Remove the excess and go on to the next 8-10 pages, laying your template against the binding each time.
Once you have cut through all the pages, fold the front to the back.  Snowman should fan nicely.  If not, open at every 5-6 pages and run you finger down the spine to fully open.  Now open the front to meet the back and glue at the top, holding together until glue dries.  Glue at the bottom, holding until glue dries.
Add thin lines of white glue down the outside edges of the snowman every few pages.  Sprinkle on glitter and shake gently to remove excess.
Cut a 2" x 3 1/4" rectangle from the black felt.  Cut a 1 5/8" circle and a 1" circle.  Join short ends of rectangle, overlapping enough to glue together  Attach the larger circle on one end and the shorter circle at the top.  Cut a very thin piece or coordinating felt 3 1/4" long and attached above the rim of the hat.
Cut another strip of felt 1/2" wide by 12" long and secure around neck of snowman for a scarf.

The instructions in the BH&G magazine include twigs for arms.  I elected to omit them.  Feel free to add them if desired.  Cut two (2) proportioned twigs for arms and attach them on either side of the snowman with the hot glue gun in between pages at the appropriate height.


I hope this craft makes you a jolly, happy soul!

Sunday, November 10, 2013

Felt Poinsettia Wreath


You can find step-by-step instructions and photos in the 2013 BH&G Christmas Ideas magazine. Otherwise, here is my best attempt at the instructions.  I do not have templates for the petals and leaves, but it's a simple sketch with a pencil.

Supplies:

10" styrofoam wreath
1 skein green yarn
White paper for making templates
2 red felt squares
1 green felt square
Red matching floss & needle
7 small gold jingle bells
Hot glue gun & glue sticks

Wrap the entire foam wreath with the green yarn, taking care to make it neat.  
Sketch a large petal  (approx 3" long) and a medium petal (approx. 2" long) on the paper and cut out.  
Using templates, cut 6 large and 12 medium from the red felt. 
Sketch a small petal (approx. 1 1/4" long) and cut 12. 
Sketch a large leaf (approx. 2 1/2" long) and cut 7 from the green felt.  
Sketch 1 large (approx. 1") and 2 small centers (approx. 1/2") as shown in photo.  Cut from green felt. 
Cut a 24" length of floss.  Thread a single floss thru the needle. Beginning with the large Poinsettia petals, pinch the end of one and stitch closed with floss. Do the same with the 2nd one stitching it next to the first petal.  Continue with all 6 petals and form a ring.  Secure with floss.  
Do the same with the medium petals and place the medium ring on top of the large ring. Stitch together. Add a center and stitch in place.  Add 3 jingle bells and then attach 3 leaves behind.  
Now make 2 medium rings and 2 small rings using the same technique as above.  Add the small rings on top of the medium rings and stitch together.  Add centers, 2 jingle bells and 2 leaves to each.
Arrange Poinsettias on wreath the way you like them and hot glue in place.

Taken from the BH&G Holiday Crafts Magazine for 2013.

Craft on!


Tuesday, October 29, 2013

Halloween Crafts

Feeling bored, I looked around my craft studio and decided to take some styrofoam and Sculpeys and create a pear-headed goon I saw in a magazine.  I wrapped the styrofoam balls in foil, rolled out the clay with my roller and went to town, wide smile, chunky arms and monster feet and all. I used carving tools to make the indentations that make up the eyes, nose, mouth, and creases on the arms, fingers and toes.  The I brought out the features of the face and body with different colors of acrylic paint.  Isn't it adorable?

I then thought I'd take more styrofoam, since I had plenty, and some felt and make a mummy.  Of course, this mummy had to have wings and a peace sign over its heart, giving it a much more friendly appearance.  I added a few splatters of blood here and there, and drew a cute bat on one of the wings.

Lastly, I had a Halloween Card that a good friend gave to me many years ago.  I really liked the silhouette on the front and bring the card out every year.  I wanted to make a decoration from it, but didn't have the hear to actually cut up the card, so I transferred with my copy machine onto a piece of mylar.  I then filled in the moon with silver glitter glue and made an outline around the edge with orange glitter glue.  I glue it to the front of a picture frame easel and there you have it!

Spooktacular if I must say so myself!


Friday, October 18, 2013

The Queen Bee, a Mixed Media Piece

While on a leaf-peeping excursion in New Hampshire, I came across a lovely antique shop in Petersburgh, Grove and Main.  I picked up some vintage glassware as well as a few pieces of ephemera.  Among the ephemera were 3 miniature porcelain dolls, one of which is featured in this mixed media craft.

Last weekend while my husband and I were sitting in our car in the parking lot of the mall I fell in love with a beautiful miniature maple tree with vibrant red and orange leaves.  I Googled it and discovered it's proper name is an Amur Maple.  I plucked a few branches and pressed the leaves.  I also used these in this mixed media piece.  While I was at it, I grabbed a few deep red leaves from a neighboring Fire Bush and included them in my creation as well.

I took an unfinished shadow box I purchased from Michaels and painted it with a mixture of acrylic paints in shades of coffee bean, vanilla & gold.  I whirled the colors with a sponge brush and applied it all over the box.  I then wadded up a paper towel and dipped back into the gold and dabbed it on here and there.  I then added an abstract scrapbooking paper with birds inside the box and dabbed some gold on it as well.


Then I began layering the dried leaves around the outside of the frame, making it heavier on the bottom right.  From there I added a ribbon and flower in the center and behind it placed the porcelain doll and added butterfly wings to make her a faerie.  I donned her with a bee to hide her nakedness and gave her a bronze crown as a finishing touch.  A brass butterfly, a flower with a crystal center, a feather and the words The Queen Bee all became a part of my creation.  I sprayed the entire piece with gold glitter spray.


I love creating mixed media art but sometimes have difficulty transferring my idea from my brain to the craft table.  This time, however, it came together well and I love the results!  Even though it has a fall feeling to it, I will keep it up all year round as I like it too much to put it away.


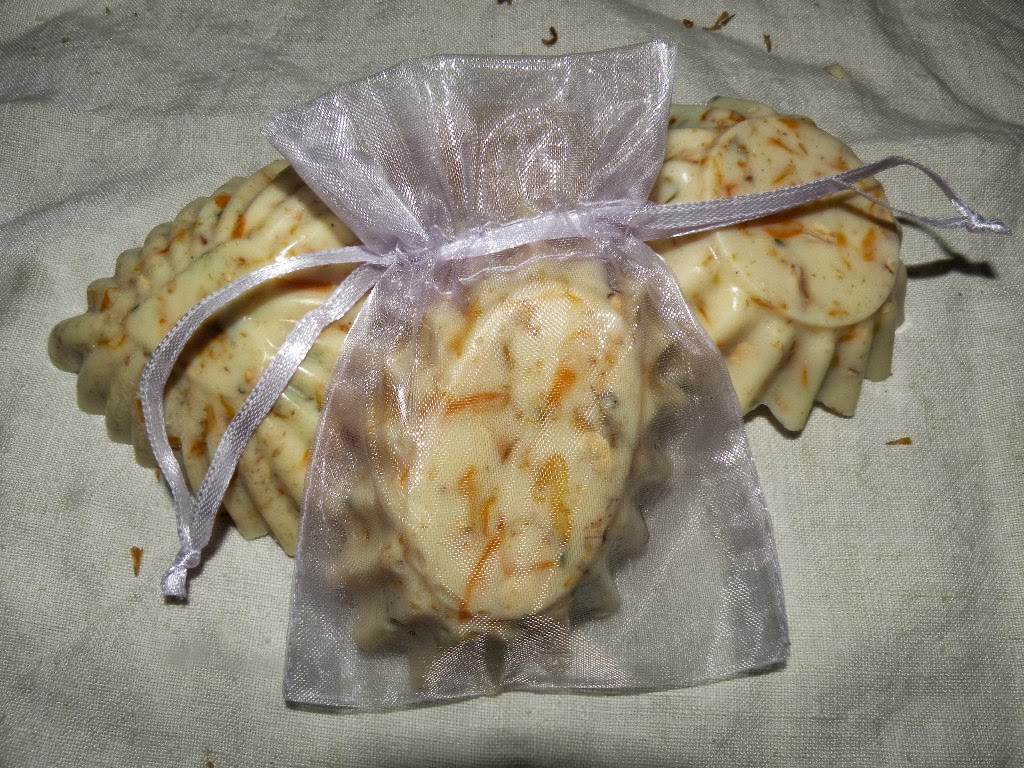
Calendula Oatmeal & Orange Glycerin Soap


This wonderful glycerin soap has honey as an astringent & moisturizer, oatmeal to relieve itchiness & gently exfoliate, marigold petals (calendula) soothe, and orange oil for a wonderful, clean scent.  They are very easy to make and ready in about 4 hours.  Package multiple in parchment paper or single in organza bags for gift-giving.  Keep a couple for yourself.  I know you will really enjoy them.  Here's how I made them ...

Ingredients:

1# block of castile soap base (I purchased my online at Bulk Apothecary)
3 T honey
5 T calendula petals (I purchased my online at Bulk Apothecary)
4 T old fashioned oats
10 drops orange essential oil (I purchased by online at Aura Cacia. You can also purchase from Bulk Apothecary)
Tartlet molds or tarlet pan with multiple molds
2-cup glass measuring cup w/spout or microwave safe bowl.  I prefer the measuring cup as it is easier to pour.
Cookie sheet
Spray bottle with rubbing alcohol

I used individual tarlet molds that I purchased on Amazon.com.  I find these easier to work with when it's time to release the soap.  However you can use a tarlet pan if you have one handy.  Oil the molds lightly with almond oil. On a cookie sheet, place a piece of waxed paper.  Place the molds on the cookie sheet and set aside.


Melt the soap base in a 2-cup glass measuring cup or microwave bowl or for approximately 2 minutes.  Check after 1 minute, stir, and return to microwave if needed.  Heat for 30 second intervals until mostly melted.  Remove and stir until completely melted.  Put the honey in a small bowl and microwave for approximately 20 seconds or until thin & runny.  Add to soap base.  Stir in calendula, oats and essential oil.

Pour soap mixture to the top of each greased mold.  You will most likely have some bubbles at the top of the poured mixture.  Take your bottle with rubbing alcohol and spray each mold with 1 quick pulse.  The bubbles magically disappear!


Let the soap mixture sit at room temperature for approximately 4 hours.  Carefully pull on the sides of each mold and pop the soap out.  If you are using a tartlet pan with multiple molds, run around the edge of each mold with a small sharp knife to coax the soap out.


Package the soaps to give as gifts or store in a cool, dry place for future use.


That's all the suds for now!