Showing posts with label halloween. Show all posts

Wednesday, October 28, 2015

Almond Witch's Fingers


Ingredients

30 sliced almonds pieces
2 large eggs
¼  teaspoon pure vanilla extract
½ teaspoon pure almond extract
8 tablespoons unsalted butter (1 stick), room temperature
½  cup confectioners' sugar
5 tablespoons granulated sugar
Pinch of salt
2 cups all-purpose flour
1-2 T cocoa powder

Heat oven to 350 degrees. Line two baking sheets with Silpats (French nonstick baking mats) or parchment paper, and set aside.
Separate 1 egg. Set aside the white. In a small bowl, whisk together yolk, remaining egg, and extracts. Set aside.
In the bowl of an electric mixer fitted with the paddle attachment, combine butter, confectioners' sugar, granulated sugar, and salt. Beat on medium speed until well combined. Add egg mixture, and beat until smooth, about 2 minutes. Add the flour, and mix on low speed just until incorporated. Wrap the dough in plastic, and chill until firm, 20 to 30 minutes.
Divide the dough in half. Work with one piece at a time, keeping remaining dough covered with plastic wrap and chilled. Divide the first half into 15 pieces. On a lightly floured surface, roll each piece back and forth with palms into finger shapes, 3 to 4 inches long. Pinch dough in two places to form knuckles. Score each knuckle lightly with the back of a small knife. Transfer fingers to prepared baking sheets. Repeat with remaining dough.
When all fingers are formed, brush lightly with egg white. Position almond nails; push into dough to attach.
Bake until lightly browned, about 12 minutes. Cool completely.

With a small, clean paintbrush, work cocoa powder in and around fingernails and knuckles to give them a ghoulish look.

Recipe adapted from Martha Stewart

Bats Witches!


Wednesday, October 22, 2014

A Bat in my Belfy Craft Project


This is a very easy and fairly quick Halloween project once you have gathered the supplies.

Supplies needed:

2" styrofoam ball
4" styrofoam egg
2 toothpicks
White craft glue
1 black stretchy sock
22 ga. black wire or thin wire easily bendable with fingers
1 black chenille stem
Black felt, stiff type (I used a sparkly one)
Scissor
Craft knife
3 beads for eyes and nose
Halloween ribbon, approximately 6" long
5x7 picture frame w/o glass
5x7 decorative paper
Hot glue gun & glue sticks
Acrylic paints, optional

Press the styrofoam ball on a hard surface flattening one side.  Press the short end of the styrofoam egg the same way to make the end flat.  Insert the toothpicks down in the flat end of the egg.  Add some white glue over the flat area. Press the flat end of the ball onto the toothpicks and gently push down until it is flush with the egg.  Let dry.

Take the stretchy sock and carefully pull it down over the styrofoam shape starting at the ball, making sure the toe seam is across the ball. Keep working the sock down across the body until it is smooth.  Tie off the sock beneath the egg with the wire.  Snip off the excess sock leaving about 1/2" (kinda like a balloon).  Take the chenille stem and wrap around the wire twice.  Trim the stem to about 2" on each side, then bend up 1/2" at the end for feet.

Make the wings and the ears.  Look at the photo below and make a wing template that is approx. 4-1/2" long and 4-1/2" tall at the widest part (on the right side).  The ear template is 3/4" wide and 1-1/2" tall.  Fold the felt in half and place the template on the folder where specified and cut one.  Cut 2 ear templates.


Fold the flat part of the ears together and place a dot of hot glue in between and pinch until glue has dried.  Decide where you will place the ears.  With a craft knife or other sharp knife make a slit for each ear and add a drop of hot glue.  With the end of one scissor blade, push the ear down into the head and let dry.  Now attach the wings to the back with the hot glue gun.

Attach the beads for the eyes and the nose with not glue.  If your beads have holes you can hide them with some glitter glue.  I used purple.  I also added a heart with the same glitter glue.

If you like the frame the way it is, no preparation is needed.  I thinned some black & purple acrylic paint and splattered it all over as my frame was too plain.

Cut a piece of decorative paper to fit in the frame as a background.  Now take your ribbon and glue one end to the back of the bat.  Place the bat against the frame where you want it; holding it in place, glue the other end of the ribbon over the top and onto the back of the frame.  That's it!  Now stand back and admire your work.  Place it in your belfry or on a tabletop or wall and you now have a new Halloween decoration that you made yourself.


(Adapted from Holiday Crafts 2014 magazine.)

Enjoy!


Tuesday, October 29, 2013

Halloween Crafts

Feeling bored, I looked around my craft studio and decided to take some styrofoam and Sculpeys and create a pear-headed goon I saw in a magazine.  I wrapped the styrofoam balls in foil, rolled out the clay with my roller and went to town, wide smile, chunky arms and monster feet and all. I used carving tools to make the indentations that make up the eyes, nose, mouth, and creases on the arms, fingers and toes.  The I brought out the features of the face and body with different colors of acrylic paint.  Isn't it adorable?

I then thought I'd take more styrofoam, since I had plenty, and some felt and make a mummy.  Of course, this mummy had to have wings and a peace sign over its heart, giving it a much more friendly appearance.  I added a few splatters of blood here and there, and drew a cute bat on one of the wings.

Lastly, I had a Halloween Card that a good friend gave to me many years ago.  I really liked the silhouette on the front and bring the card out every year.  I wanted to make a decoration from it, but didn't have the hear to actually cut up the card, so I transferred with my copy machine onto a piece of mylar.  I then filled in the moon with silver glitter glue and made an outline around the edge with orange glitter glue.  I glue it to the front of a picture frame easel and there you have it!

Spooktacular if I must say so myself!


Saturday, October 12, 2013

Dremel Dee Dremel Dum, Carving a Pumpkin is So Much Fun


This is the first time I've have used my Dremel tool to carve a design on a pumpkin.  I used a Fun-Kin Pumpkin (fake) from Jo-Ann's.  It took me about an hour to finish it and wasn't quite as bad as I had anticipated.  Actually I was into it and was definitely getting better as I went along.  It was messy, but well worth it.

I looked online for a design and decided on this one.  I love owls and I love the face in the moon - perfect! I then attached it with tape to the side of the pumpkin I felt was most suitable.  Taking a pen that no longer has ink in it, I went over the outline of the design, pressing firmly, in order to transfer it by leaving an indentation of the design onto the pumpkin itself.  Once I did that I went over the indentation with a Sharpie. That probably wasn't my best idea as I was unable to carve off all of the Sharpie lines.  I used nail polish remover to remove any black marks remaining.

Considering I've never done this before, I was pleased with the way my design turned out.  I have a couple other ideas for the next time, and also need to carve deeper so that the light shines thru better.  It will take a lot of practice to get full control over the Dremel in order to carve deeper in and around all the tiny detail.

If you should decide to tackle a carved pumpkin for yourself, I cannot stress enough the importance of wearing safety goggles and doing this outside if possible.  The front of my goggles were covered with rubber orange dust which would have been in my eyes otherwise.  My clothes, Dremel and the deck were also orange.  I cleaned up the table, carved pumpkin and my Dremel with a dry paint brush.  Worked like a charm.


Wednesday, October 9, 2013

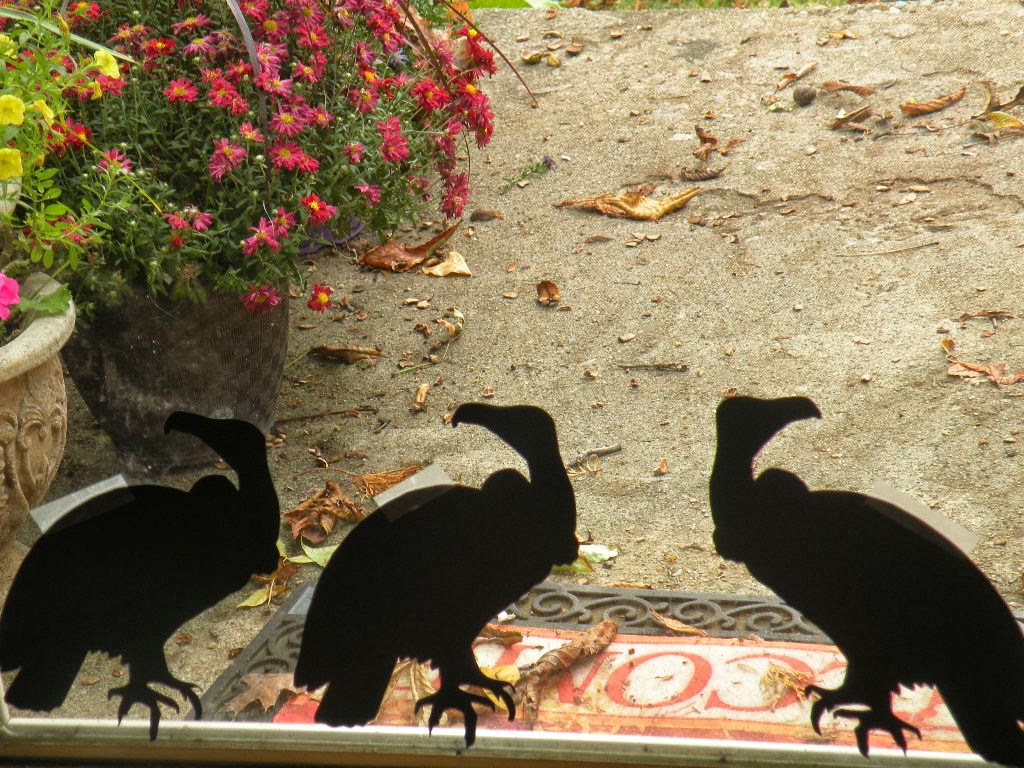
Buzzard Window Silhouettes

 These buzzards were so easy to make.  I used medium weight black scrapbooking paper, transferred the outline with a chalk pencil, and cut out 3 at a time with a pair of kitchen shears.  You can use a craft knife, but I would not suggest cutting through more than 2 at once.  I taped them to the window and the storm door, however, you can see the tape.  I have to buy some removable adhesive and adhere them that way, but did not have any on hand.

The template and directions are on The Graphics Fairy blog.