Tuesday, December 17, 2013

White Chocolate Holiday Bark


Everything but the kitchen sink is included in this holiday bark. Feel free to substitute, add or delete any ingredients.

This is what I used:

Toasted Cashews, Pepitas & Whole Almonds
Chopped dried pineapple and apricots
Dried cranberries and cherries
Mini M&Ms
24 oz. white chocolate, divided
Chopped red & white Andes Candies
Fleur de Sil (optional)

Combine nuts, fruits, mini M&Ms in a bowl. Set aside.
Melt 18 oz. chocolate in a bowl over a pot of boiling water.
Spread onto a parchment-lined baking sheet; use two if necessary.  Use an offset spatula to smooth out the chocolate to a little less than 1/4".
Sprinkle the the fruit and nut mixture over the top leaving some white chocolate showing.  Press in slightly.
Sprinkle very lightly with Fleur de Sil. I used less than 1/4 tsp.
Melt remaining white chocolate and drizzle back and forth over the fruit and nuts.  Sprinkle with Andes Candies.
Let sit for 2-3 hours until completely set.
Break into pieces and store in an airtight container.


Chocolate, Whiskey, Marshmallow, Caramel & Bacon Bark

When I saw this recipe, it was so unusual, I knew I had to try it.  It is as good as it looks.  The sweet, the salty, the touch of whiskey and the chocolate all come together fabulously.

The only negative I feel compelled to point out is that it's very time-consuming and only makes an 8x8 product.  Next time I would use a large dish and make it thinner so it goes further.

Here's the recipe: http://www.endlesssimmer.com/2011/12/08/edible-holiday-gifts-whiskey-caramel-mashamallow-and-bacon-bark/


Monday, December 16, 2013

Dulce de Leche Cupcakes


For my girlfriend's 60th birthday party, she asked if I could do a caramel cupcake.  Caramel is what she got!  This is a brown sugar cupcake, with a soft caramel center, dulce de leche and cream cheese frosting, drizzled with heated dulce de leche.  Can I do caramel?  You betcha!

Here is the link to recipe I used for these outrageous cupcakes: Dulce de Leche Cupcakes.  These are not filled, so following my directions below to add the soft caramel center.

To make the soft caramel center, place 3/4 c caramel chips and 1/4 c heavy cream in a medium sauce pan.  Heat on low, stirring until caramel is melted.  Remove a 1" center from each cupcake using a paring knife.  Set aside.  Spoon caramel into each cupcake and replace with the center you removed.  Frost according to recipe.


Creme of Coconut Poke Cake

Super moist and flavorful, this luscious cake is a must when you are craving the richness and sweetness of coconut.  It's simple to put together.  Waiting for it to chill thoroughly is the hardest part of this recipe.

Ingredients:

1 box white cake mix, prepared according to instructions on box
1 can sweetened condensed milk
1 can Creme of Coconut NOT coconut milk
1 12 oz. container of non-dairy topping
1 8 oz. pkg, sweetened coconut

Prepare cake mix and bake in a greased and floured 9x12 dish.
While cake is baking combine the sweetened condensed milk and the Creme of Coconut in a bowl and whisk until smooth.
Immediately after cake is removed from the oven, poke holes all over the top (I used a chop stick) and pour the milk mixture over the top.
Allow to cool completely before placing it in the fridge to chill.  Once the cake is thoroughly chilled, spread non-dairy topping over the top and sprinkle coconut evenly over it.  Return to the fridge and

Enjoy!


Kahlua Cocoa Balls


I looked at a few recipes and didn't like any one 100%, so I took the things I did like and added my own touch and this is what I came up with.  These are better made at least 2-3 days ahead; 1 week is best.  Gives all the flavors time to marry.

Ingredients:

2 c graham crumbs
1 c confectioners' sugar
1/3 c unsweetened cocoa
10 oz. finely chopped bittersweet chocolate
1/3 c Kahlua mixed with 1 T espresso powder
1/4 c dark corn syrup

Heat the Kahlua and the espresso powder in a microwave safe bowl for 15 seconds.  Stir until espresso powder is dissolved. Mix all ingredients in a large bowl with your hands until they are totally blended and come together. The dough should be just moist enough to hold its shape; not crumbly. If mixture is too crumbly, add another tablespoon of corn syrup.  In another bowl sift some unsweetened cocoa.  Roll each ball into the cocoa and store in an airtight container for 2-3 days before serving.


Wednesday, December 11, 2013

Chocolate Icing for Brownies, Pound Cake and more!

This is my "go to" recipe for a quick pourable and fudgy icing that I use for brownies and chocolate pound cake mostly.

Ingredients:

1 stick butter
4 tbsp. cocoa
6 tbsp. milk
1 tsp. vanilla
1 box powdered sugar, sifted

Combine butter, cocoa and milk in sauce pan and bring to a boil. Add vanilla and stir to combine.  All at once add the sifted sugar and stir vigorously until well combine.  Quickly pour over your cake or brownies while it is still warm.  Garnish with nuts or sprinkles if desired.

Suggestions for use:  Your favorite brownies, butter or chocolate pound cake, vanilla ice cream, cake pops, sugar cookies, chocolate buttermilk cake or grab a spoon and eat from the pan!


Chocolate No-Bake Chunky Bars

This recipe is so easy, you won't hesitate to make it again and again.  Filled with oatmeal, coconut, fruit and nuts, there's so much going on it's like a party in your mouth.

Ingredients:

1 c peanut butter, creamy or chunky
1/2 c honey
1/2 c coconut oil
2 c old fashioned oats
1 cup shredded coconut
1/2 c each of chopped nuts, raisins and dried cranberries
1 1/4 c bittersweet chocolate chips
1 tsp vanilla

Melt the peanut butter, honey and coconut oil over medium-low heat in a saucepan, stirring so as not to burn.

Once its all melted and combined, remove from heat and add the remaining ingredients.  Stir until the chocolate chips are completed melted.

Pour into a buttered 9x13 pan and cool in the fridge.  When hardened, cut into bars.

That's it!


Monday, December 9, 2013

Rainbow Cookies


I love Rainbow Cookies.  I do not see them too often, but when I do, I will usually pick up some. This year for Christmas I decided to make my own.  They are not as complicated as I thought, albeit a bit tricky when it comes time to layer them.  They turned out wonderfully delicious.  Rather than re-print the recipe here (it is a bit lengthy), I am providing a link to the one I used from the Food Network.   Note:  I did not have any 9x12 pans, well maybe one, but did have 3 of the usual size jelly roll rimmed baking pan which is much larger.  To accommodate those pans, I doubled the recipe.  And another note, I used apricot jam over the green layer, but used raspberry jam over the red layer.  Yum!


Happy Holidays!


Christmas Craft Potpourri


Since I have some extra time on my hands now after losing my job this past summer, I challenged myself to see how many crafts I could create before my baking schedule filled up.  Here are a few of them.  If anyone is interested in the directions, I'm glad to oblige.  Please send an email with your request.

Firstly, about 4 years ago I broke a large red wine glass.  I immediately threw all the pieces away and then after a few seconds of thought, went back in and grabbed the bowl.  I didn't know what yet, but I knew it would come in handy some day.  This year I finally used it as a cloche.  I picked up a candle dish at a yard sale over the summer and this "cloche" fit perfectly inside of it.  Some bottle brush trees - my favorite, figures from snow village scenes, a cut out of a house in the background, a jar of snow, assorted ephemera, and of course lots of glitter - voila!


Side note:  I've used broken stemware where a big part of the stem and the entire bowl were intact; mostly missing the foot, and stuck it outside in a flower pot and poured water in it for the birds, butterflies, etc.


This craft was inspired by something I saw in a store while waiting in a long line to pay.  Theirs was very simple - 2 green trees and silver glitter.  The wheels began turning and this is what I came up with, again with my bottle brush addiction.

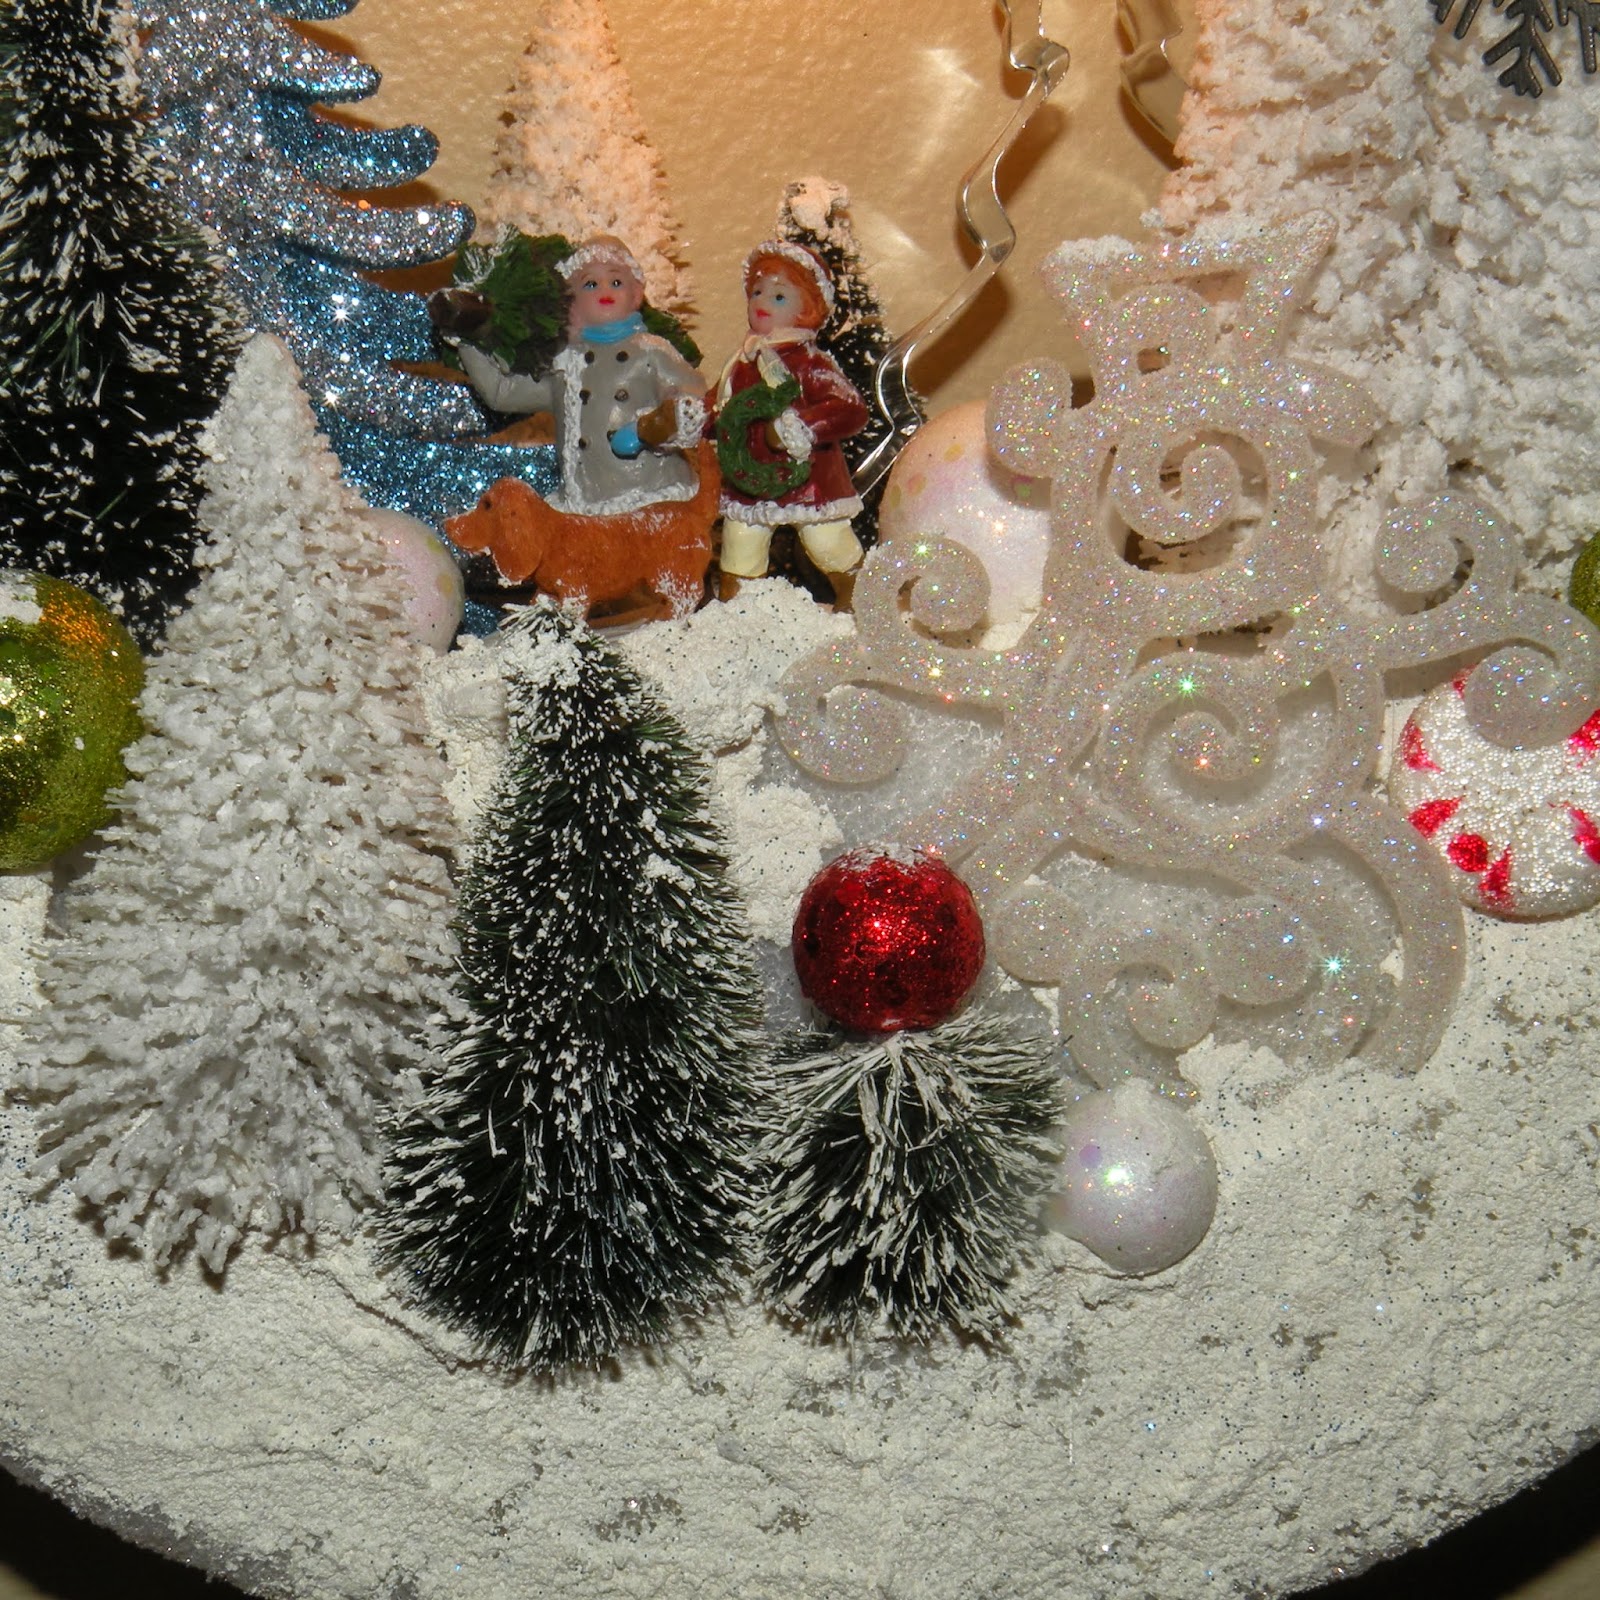
Basically I took a 10" foam wreath and a 6" foam circle.  I cut 1/3 from the top of the circle and attached it inside the wreath to act as a platform for all the pieces I was about to stuff in it.  I added bottle brush trees of varying types, a tree cookie cutter (peeking out behind the large white tree on the right), a blue tree ornament and a fancy snowman ornament purchased from the Dollar Store.  I also included a figure from a Snow Village (center), some sparkly colored balls, metal snowflakes, GLITTER and a light.  The cord from the light is held in place with floral pins.  You will need to fashion a hanger for the back that sticks out beyond all the trees and the light socket.  I use 20-gauge wire.

The above photo was taken without the light turned on and with a flash.  Below are other photos with different settings.  Still not able to really capture what you see in person.


Since I've acquired a fondness for owls over the last year, I made this Mixed Media piece over stretched canvas.  I used Christmas-themed scrapbooking paper, stickers, mylar owl, silver tinsel, glass starts and glitter!  The owl is clear in person.  It's 2 layers and the flash caused it to shadow.  I used self-adhesive spacers when I attached the cutouts to give more dimension.


Last is a rustic tree with star cutouts made from a 14" styrofoam cone.  First I cut the cone down the middle, then I thinned each side out with a spoon (hard work, but ....).  Once I had them to about 1/4" thick, I carved out stars on one half, taking care to leave the star pieces totally in tact as I would be using them later.  I then painted the tree Black Cherry, inside and out, using acrylic paint, and each star I cut out in Gold.  When all pieces were completely dry, I glued the stars against the cutouts in an offset pattern, not directly in line with the cutout.  Once dry, I glued the two sides of the tree back together.  With 20-gauge copper wire I formed a star and attached it to the top.


Have a wonderful, blessed holiday season!