Thursday, August 29, 2013

Carla's Lemon Cardamon Wedding Cookies


I watch The Chew almost every day, and Carla Hall, one of the five (5) celebrity co-hosts, made this mouth-watering confection recently.  I knew I had to try them and they are fabulous!  I didn't feel the need to change a thing and made them exactly as written, so Carla gets all the credit.  The photos are mine, but the recipe is taken directly from The Chew website.

Ingredients
1 pound Unsalted Butter (room temperature)
1 cup Powdered Sugar
1 tablespoon Vanilla Extract
2 teaspoons Lemon Juice
2 teaspoons Lemon Zest
2 teaspoons Orange Zest
1 1/2 teaspoons Salt
1 1/2 cups Pistachios (ground) or 1 cup Walnuts (ground)
4 1/2 cups All-Purpose Flour
2 teaspoons ground Cardamom

For the Lemon Sugar:
3 Lemons (zested)
2 cups Powdered Sugar

1 pound Unsalted Butter (room temperature)
1 cup Powdered Sugar
1 tablespoon Vanilla Extract
2 teaspoons Lemon Juice
2 teaspoons Lemon Zest
2 teaspoons Orange Zest
1 1/2 teaspoons Salt 

Preheat oven to 350 degrees F. Prepare baking sheets with parchment paper. Using an electric mixer, beat together the butter and sugar until fluffy. Add the vanilla, lemon juice, zests and salt and beat until combined.

4 1/2 cups All-Purpose Flour
1 1/2 cups Pistachios (ground) or 1 cup Walnuts (ground)
2 teaspoons ground Cardamom 

In a medium bowl, whisk together the flour, ground nuts and cardamom until combined. Add the flour into the butter mixture in 3 additions, making sure not to over mix the dough.
Using a tablespoon or small ice cream scoop, portion out dough and roll into balls. The size of your cookie depends on the cupcake liner that you will present them in. Place the cookies about 1 1/2 inches apart on the prepared baking sheets. Bake for 18 to 20 minutes trying to avoid brown spots but making sure the top is just firm to the touch.


Meanwhile, place the lemon sugar in rimmed baking dish or pie plate.
Remove the cookies from the oven and allow to cool slightly. The cookie should still be warm when rolling in the lemon sugar. Roll the cookies to coat completely in the flavored sugar and allow to cool completely on a wire rack. Reserve the remaining lemon sugar.
When ready to serve or package roll them again in the lemon sugar to heavily coat. These cookies can be baked up to one month in advance and stored in the freezer in an air tight container. Before serving dredge in the lemon sugar to coat.

3 Lemons (zested)
For the Lemon Sugar: Prepare a baking sheet with waxed paper. Spread the lemon zest onto the prepared baking sheet trying to avoid clumps. Place the baking sheet in a cold oven and allow to sit overnight.
2 cups Powdered Sugar

The zest should be dry before combining with the sugar. Pulse zest and sugar together in a food processor until evenly distributed. Set aside until ready to roll the cookies. If making the cookies far in advance roll them in a plain powdered sugar and prepare the lemon sugar for the final coating.
See those flecks of pistachio nuts and lemon & orange zest!

These buttery balls of deliciousness melt in your mouth - and I'm not kidding!
Helpful Tips:
1. Prepare these cookies in advance and freeze them until you’re ready to serve.
2. Cardamom is similar to cinnamon, so you can substitute it if you need.
3. Don’t worry about overworking these cookies because there is enough butter and sugar to prevent them from becoming tough.
4. Toss the cookies in the powdered sugar while they’re still warm to make the sugar stick better.
5. Use dried lemon zest instead of fresh, which will cause your powdered sugar to clump because of the moisture. 


Wednesday, August 28, 2013

Chocolate Hazelnut Flourless Cake


Can you say decadent?  How about orgasmic?  This rich, dense flourless cake has made it on the top 10 list of my favorite desserts.  There is some prep involved, but knowing that going in alleviates the surprise.  Read the recipe entirely first so you are prepared.  Have the ingredients ready ahead of time.  This dessert is definitely worth the extra work.

Ingredients

1 sleeve Lorna Doone shortbread cookies
1/2 C finely chopped hazelnuts
3 T butter, melted

1 recipe Hazelnut butter (see below)
8 ounces bittersweet chocolate, chopped
8 ounces milk chocolate, chopped
2 tsp. instant espresso
1 C Nutello or other hazelnut spread
6 eggs
1/2 C sugar
1 C heavy cream
8 ounces mascarpone cheese
1/4 C sugar
Unsweetened cocoa
Whole hazelnuts, toasted

Preheat oven to 350 degrees. Butter the bottom and sides of a 10" springform pan. Wrap outside of pan tightly with heavy duty foil; set aside.  For crust, in a small bowl stir together crushed shortbread cookies and the 1/2 C chopped hazelnuts.  Add the melted butter and mix together until moistened. Press into the springform pan.  Set aside.
Prepare hazelnut butter; set aside. In a medium microwave safe bowl add the chocolates and the instant espresso.  Heat on medium-high setting approx. 1 minute and 20 seconds, stirring occasionally until smooth. Stir in hazelnut butter and Nutello.

In a large mixing bowl beat eggs with a mixer on medium until frothy. Gradually add sugar, beating on medium-high until mixture is thick (approx. 5 minutes).  Pour mixture into egg mixture and fold gently.

In another bowl beat the heavy cream on medium until soft peaks form. Gently fold into chocolate mixture.  Pour mixture into pan and spread evenly.  Place pan in a roasting pan. Place roasting pan in oven and pour enough hot water into the pan to reach halfway up the sides of the springform pan.
Bake for 1-1/4 hours. Turn off oven and let cake sit in oven with door closed for 45 minutes.

Carefully remove springform pan from water. Cool on a wire rack for 2 hours. Loosen cake from sides of pan, remove foil and cover and chill for 4 to 24 hours.  Let cake stand at room temperature for 30 minutes before serving.

In a medium mixing bowl with whisk attachment beat mascarpone cheese & sugar until fluffy. Add to a pastry bag with star tip and pipe around the edge of the cake.  Dust edge with cocoa and garnish with whole hazelnuts.  You can also serve the mascarpone mixture on the side.

Hazelnut Butter: Place 1 c toasted hazelnuts in a food processor. Process until it forms a paste. Add 2 T vegetable oil and pulse until well combined.

This recipe was adapted from the Gianduja Mousse Cake recipe featured in the Better Homes & Gardens Fall Baking publication.


Honey & Pear Upside Cake

This time of year the pear trees are engorged with their sweet fruit.  There seems to be an abundance this year, and every magazine I open has a recipe or two incorporating pears.  I wanted in on this bandwagon, so here you are.  A wonderful 8" single layer upside down cake with pears as the star!  There are so many wonderful ingredients in this recipe, you will want to drop everything and run to the store so you can get back and put it together right away.  I was dying to get it done so I could bite into it, hoping it tasted as good as it sounds and looks.  It did not disappoint!

Ingredients:
1/2 C Honey
1/3 C butter, melted
2 T light corn syrup
2 Tsp lemon zest
4 Tsp juice from a fresh squeezed lemon
1/2 C chopped pecans
2 Ripe Bartlett pears, peeled & chopped into 1/2" chunks
1 1/2 C old fashioned rolled oats
1 C all-purpose flour
3/4 C packed brown sugar
1/2 C chopped pecans (in addition to the 1/2 c listed above)
1 Tsp baking powder
1/2 Tsp baking soda
1/2 Tsp salt
2 eggs, lightly beaten
2/3 C buttermilk
4 T butter, melted
1 1/2 tsp vanilla

Directions:
Preheat oven to 375 degrees. Generously grease an 8-9" cake pan or cast iron skillet.  I used a skillet.  Set aside. In a small bowl combine the honey, 1/3 C melted butter, corn syrup, lemon zest & juice. Stir in the first 1/2 chopped pecans.  Pour into prepared cake pan and top evenly with chopped pears.

Place oats in a blender or food processor and process until finely ground. Transfer to a large bowl. Stir in flour, brown sugar, 2nd 1/2 C of chopped pecans, baking powder, baking soda & salt. Make a well in the center.

In another bowl combine eggs, buttermilk, 4 T of melted butter & vanilla.  Pour egg mixture into well in flour mixture. Stir just until moistened (batter will be lumpy). Pour batter over pears and spread evenly.


Bake 30-35 minutes or until tester inserted in the center comes out clean. Immediately invert onto a plate and scrape an remaining honey mixture over the cake.


Serve warm. Makes 8 servings.
*Serve with sweetened whipped cream sprinkled with fresh grated nutmeg, if desired.


This recipe was adapted from the Honey-Glazed Buttermilk Coffee Cake recipe featured in the Better Homes & Garden Fall Baking publication.


Tuesday, August 27, 2013

A Quick Tip to Smooth "Fluffy" Hair and Relieve Itchy Scalp

If you suffer from an itchy scalp and have hair that wants to frizz rather than relax, here is a tip that my wonderful hair stylist shared with me and it really works.  As a bonus, it also helps relieve dry itchy skin on your arms and legs as well.


It's so simple and doesn't require any money, and may even actually save you a few cents over time.

After you shampoo and condition your hair, turn the water as cold as you can stand it and hold your head under the shower head for a minute or two.  If you can stand there much longer than that, it's probably not quite cold enough.  Let the cold water run down over your hair and your body. Each time I take a shower, I try and stand there for a few seconds longer. I think you will be surprised at the results.

I have a long, full head of course hair and a water softener.  However, I am always scratching at my head and my skin.  My hair is always frizzy for the first day or so.  Since my hair is so thick, I only need to wash it every 3 days.

Since I've been turning on the cold water at the end of my showers, my hair is smoother and my skin isn't as itchy.  Why this works?  The cold water closes the pores of your hair shaft and your skin resulting in smoothness.  And because cold and itching sensations travel along the same nerve fibers, cool water can achieve relief from itching.

No products to buy and running the cold water for the last minute or two uses less hot water, which in turn, means a penny or two back in your pocket!

Keep it cool!


Fall Arrangement in a Pumpkin Basket

My first craft for Fall is this wonderful arrangement made with supplies purchased on sale from Michaels Arts & Crafts.  The basket and the florist's foam were not on sale, but all the floral stems were.  The basket was $14.99, but I used my 40% off coupon to help with that.


Supplies I Used:
1 large Pumpkin Basket w Grapevine Handle and Bittersweet around the rim
1 round florist's foam to fit inside
1 large feathery type stem as the focal point
A variety of stems that caught my eye, including foam berries, leaves & acorns
Excelsior to cover the openings & hide what lies beneath
A woodland owl as the main accent rather than a bow

Directions:
Remove all the tags from your stems so you're ready to go!
Place the foam inside the basket and seat snugly on the bottom.  Note: You may have to cut the foam in half and place one half in at a time to make it fit.
Start with your focal stem.  In my case it was the large feathery one.  I placed that in the middle and to the back of the handle.
Fill in with the next largest stem(s) and continue, ending with the smaller stems.
Once you have it arranged the way you like, take the excelsior and stuff in all around the stems so you hide the bottom of the stems and the foam.
Now, add your accent piece. Ta da!

Stand back, admire and let out a big sound of satisfaction!  Now go find that perfect spot in your house for it and be proud of what you just created!

Creatively yours,

Magic Wings


No one could believe that I had never visited a butterfly conservatory considering how much I love butterflies.  Well now when asked I can proudly respond "Yes, I've been to Magic Wings in South Deerfield, MA and loved it!"  I spent over 3 hours there wandering thru swarms of butterflies from North America, South & Central America & Asia, photographing each and every one of them.  Of course my ultimate goal was to have my picture taken of one that landed on me.  I wore a colorful top with butterflies on it in the hopes of luring them in and hopefully finding me enticing enough to take a rest from flight. I was there well over 2 hours before one ever touched down, and each time one did, Rob was no where in sight, and when a nearby visitor offered to help, they'd take flight again.
Cairns Birdwing - Male & Female (Asia)
Rice Paper (Asia)


Finally, at the end of our visit, a Blue Morpho decided to land on my hand and hung around long enough for me to take a couple "selfies" in addition to a kind woman snapping a couple for me as well.  The Blue Morpho is a beautiful butterfly, however, since the blue is on the top of its wings, you can only see it when in flight or should they open their wings when they land.  I was glad this was the one that chose me as it was probably my favorite of all.

Blue Morpho (Central/South America)


I took this video of a pair of butterflies doing the mating dance.  I was not able to identify them as they do not appear on the conservatory's chart.  Take a look.


The Yankee Candle flagship store is also on the same road, just a little ways down.  This store is hugnormous!  Not only does it have a candle emporium, it also includes a large gourmet food section, a gardening area, a housewares & gifts area, a sports area and miscellaneous other nooks & crannies.
Malachite (Central/South America)

Happy Wings to You Until We Meet Again!


Warm Roasted Vegetable & Arugula Salad - WW PPV = 4

Ingredients:

1 bag Baby Arugula
1 large bag mixed Baby Bell Peppers, whole
1 lb. baby Portabella Mushrooms, whole
1 large Zucchini, sliced
1 container fresh Brussel Sprouts, halved
1 bunch of fresh Asparagus, cut into 2" lengths
1 medium red onion, thinly slice*
2 T olive oil
Salt & Pepper
Cherry, grape or sliced vine-ripened tomatoes (optional)
1 T balsamic vinegar
Pecorina cheese, shaved. About 4 pieces per serving.

Servings: 4

*I added the onion raw on top of the finished salad as I prefer the taste and the crunch.  If you would rather roast the onion, cut into quarters and put in baking pan along with other vegetables.

Directions:

Preheat oven to 400 degrees.
Place the washed bell peppers, mushrooms, zucchini, brussel sprouts, asparagus (and onion if desired) in a large baking pan.  Drizzle olive oil and sprinkle with salt and pepper.  With your hands, toss the veggies so that the oil and seasoning is evenly distributed.  Place in oven and cook until tender approximately 45 minutes, stirring halfway through.  When vegetables are nicely roasted remove from oven and let sit 15 minutes before serving.


Divide the arugula among individual plates.  Place warm vegetables on top of each one. Add some tomatoes and drizzle with balsamic (or you can substitute a favorite salad dressing, adjusting the points as necessary).  Top with red onion and pecorino.


Friday, August 9, 2013

You Say Frittata, I Say Frittata

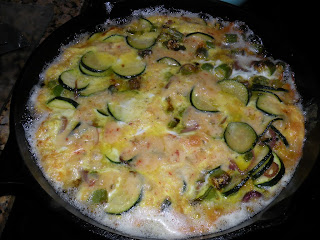
Vegetable Frittata w Zucchini & Fried Okra
I made this delectable frittata for dinner the other night.  Many times during the summer, I long for something on the lighter side for dinner.  I tend to gravitate to meatless entrees during those times.  Being a believer that anything you normally eat for breakfast can be eaten at any other meal during the day, I decided to make a frittata with the many vegetables I had on hand.

I had zucchini, onions, garlic & jalapenos on my counter.  In the freezer I had a bag of cut okra, and additionally, I pulled some pepper jack cheese from the frig.  The rest is history.  If you have a 10" cast iron skillet, you are ahead of the game and have the correct "tools" for the job.

Here we go:

Ingredients:

1 bag of frozen cut okra, thawed (of course fresh will do as well)
1/2 C course ground yellow corn meal
1/4 C all purpose flour
1/2 tsp. salt
1/4 tsp. pepper
1/4 C vegetable oil

6 Eggs, beaten
pinch of salt
2 T olive oil
1 T butter
2 medium zucchini, thinly sliced
1 small onion, diced
2 cloves garlic, minced
1 jalapeno pepper, seeds removed, diced (leave seeds in tact if you like it hot!)
1/2 C grape tomatoes, halved
1/2 C sliced mushrooms
6-8 oz. pepper jack cheese, cut into 1/2" chunks
Fresh salsa, optional
Sour cream, optional

Preheat oven to 375 degrees.

Heat the vegetable oil in a 10-inch cast iron skillet.  Prepare the okra by mixing together the corn meal, flour, salt & pepper.  Add the thawed okra and coat thoroughly.  Add to hot oil and fry until golden brown.  Remove from oil and set aside.

Append remaining vegetable with enough olive oil to make about 2 T, and put over medium heat. Add zucchini, onion, garlic and pepper.  Cook 2-3 minutes or until tender.  Add mushrooms and cook for 1 minute more. Pour eggs into skillet and add tomatoes, okra, cheese, & a pinch of salt.  Continue cooking until edges of egg begin to cook.

 Slide skillet into hot oven.  Bake approximately 20 minutes or until edges are brown & bubbly and middle is set.


Cut into wedges and serve,  If you have on hand, top with salsa and sour cream if desired.


Mangia!


Refreshing Watermelon Granita

A cool summer treat!
I hosted a Garden Luncheon for 8 girls (I'd say ladies, but we're all so young at heart, girls seems more appropriate) a couple weeks ago, and I served this amazing cool treat as a palette cleanser before dessert.  I saw this recipe in one of my magazines and was anxious to give it a try.  When I was vacationing over July 4th at the shore, I was craving watermelon Italian ice.  I'm sure such a thing exists, but was unsuccessful in finding any.  So when I came across this recipe, I knew it would be a suitable alternative.  It was not only suitable, it was better than what I imagined the Italian ice version would be.  Here's how I made it:

Ingredients, simple:  Simple syrup, 1 lime, sliced and approx. 10 cups watermelon, cut into 1" chunks

To make a simple syrup, combine 1/3 C sugar & 1/3 C water in a medium saucepan.  Heat until it comes to a boil, stirring continually until the sugar dissolves. Add the sliced lime and simmer 1 minute. Remove from heat, strain and cool.

In the meantime, cut up the watermelon.  Once the syrup has cooled, place the watermelon & the syrup into a food processor, processing 1/2 batch at a time until smooth.  Pour the entire mixture into a 13x9x2 glass dish and place in the freezer.  Every 45 minutes remove from the freezer, break up with a fork and return to the freezer.  Do this over a 3-4 hour period until the mixture has become a sparkly dish of frozen flakiness.

To serve, pile into individual bowls or martini glasses and garnish with a sprig of mint.
Note:  Try to time it so it's ready when you are.  It should be served immediately as the mixture will harden over time.  If you're unable to time it as so, you can always put small batches in the food processor to break it up.  However, the consistency is not as good as when it's served immediately after it's ready.

The lime adds a wonderfully subtle "something extra" to the taste.  I didn't think I would like it and almost didn't put it in, but I'm glad I did.

"Oh, oh Granita, we can make it together!"


Thursday, August 8, 2013

Enchanted Garden Flowers Using Repurposed Glassware


I just love making these!  They are lovingly created by repurposing yard sale finds in such a way that each flower is unique. A bit of glue, a sprinkling of beads & a dash of faerie dust help to produce a magical piece worthy of your yard & garden.  Each flower has a "winged" accent created from beads and is mounted on copper tubing.  If you're in the Mid-Hudson Valley NY area, you can see them on display at Isabella's Treasures on Front St. in New Paltz.  Just another Winged Musing creation that I am proud to share on my Blog.

Creatively yours,